


You will find many occasions to serve this Easy Cheese and Herb Filo Pie, which meets all the required criteria for my favourite recipes. It is quickly and easily made and is full of flavour. Furthermore, you can assemble it in just 20 minutes and while it bakes there is time to prepare a salad to accompany it.
Jump to:
Why we love this recipe:
If you find the thought of making pastry daunting, here is the recipe for you! This Pie uses commercially prepared filo pastry, making it ideal for the novice or the experienced cook.
Filo is a versatile pastry, with numerous ways to enjoy it, in either sweet or savoury dishes. It is simple to use but there are a few tips for working with filo and I explain them below.
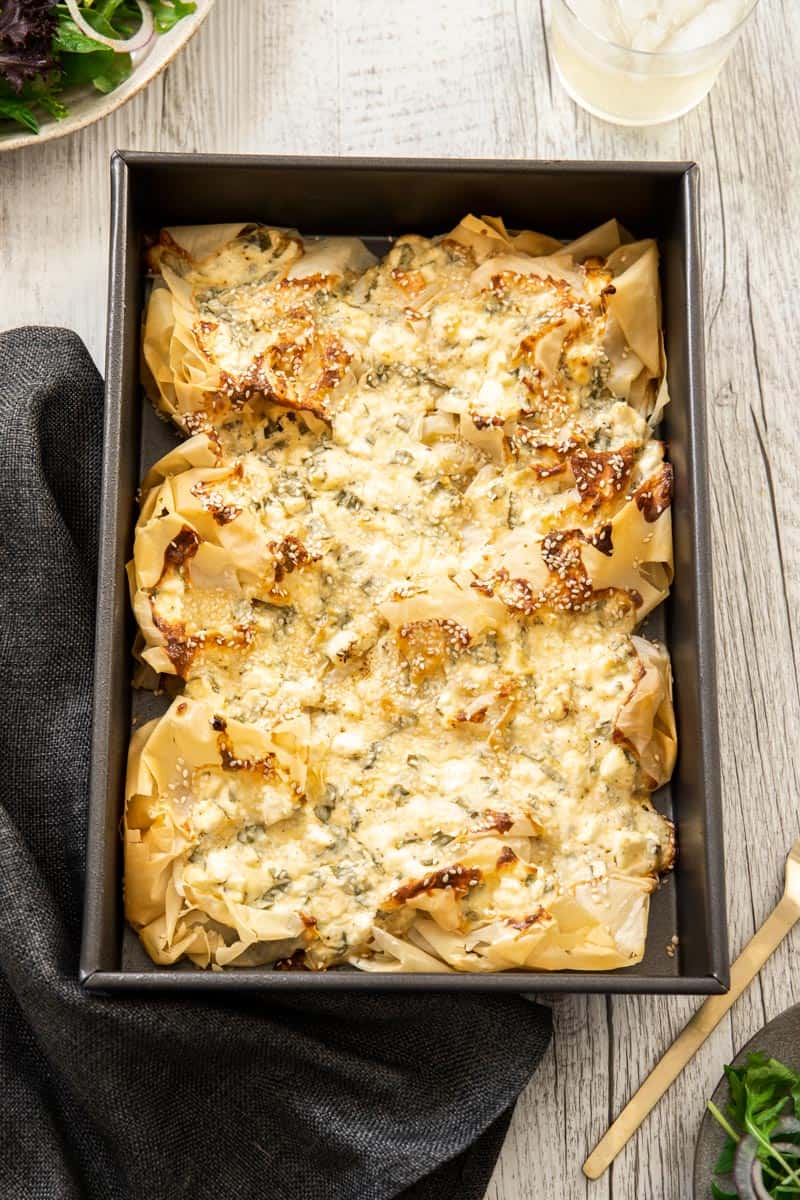
The Greek name of this type of pie is patsavouropita which translates as "rag pie". It is this style of pie which makes the recipe so appealing. There is no need to carefully place each layer of filo precisely on top of each other; the filo is simply scrunched up like a rag and placed in the baking dish. It is an extremely satisfying process because you really can't get it wrong.
You can serve this Cheese and Herb Filo Pie as a starter or as a light, meat-free meal with a green salad. It is also ideal for a snack or as finger food with a glass of wine.
Ingredients in this recipe:
Please see the recipe card further along in the post for exact quantities of ingredients and the full method.
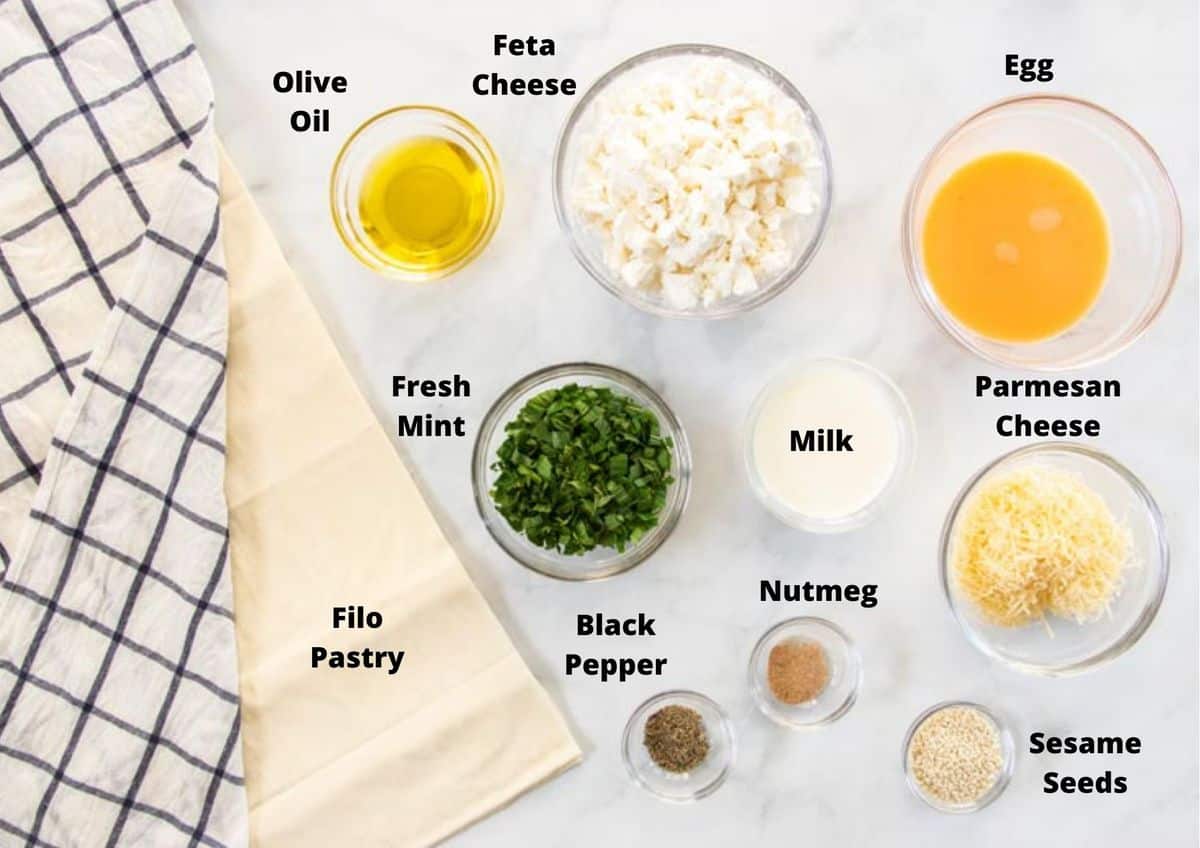
Filo pastry - this pastry is crispy and crunchy and so easy to work with.
Olive oil - use good quality olive oil, an essential ingredient in the Mediterranean diet.
Feta cheese - use the feta of your choice, but traditionally the pie would contain Greek feta.
Parmesan cheese - use freshly grated, good quality Parmesan, such as Grana Padano.
Eggs - I used large, free-range eggs.
Milk - use full cream or low fat.
Fresh mint - adds a bright note.
Ground nutmeg - freshly grated will have the best flavour.
Freshly ground black pepper - has better flavour than pre-grated pepper.
Sesame seeds - have a nutty taste. Use either black or white.
Step by step instructions:
To begin, preheat your oven to 180 Degrees C (350 F).
Spread the filo pastry out on your workbench on a sheet of waxed paper or a sheet of cling wrap.
Immediately cover the pastry with a sheet of waxed paper or barely damp tea towel to avoid it drying out.
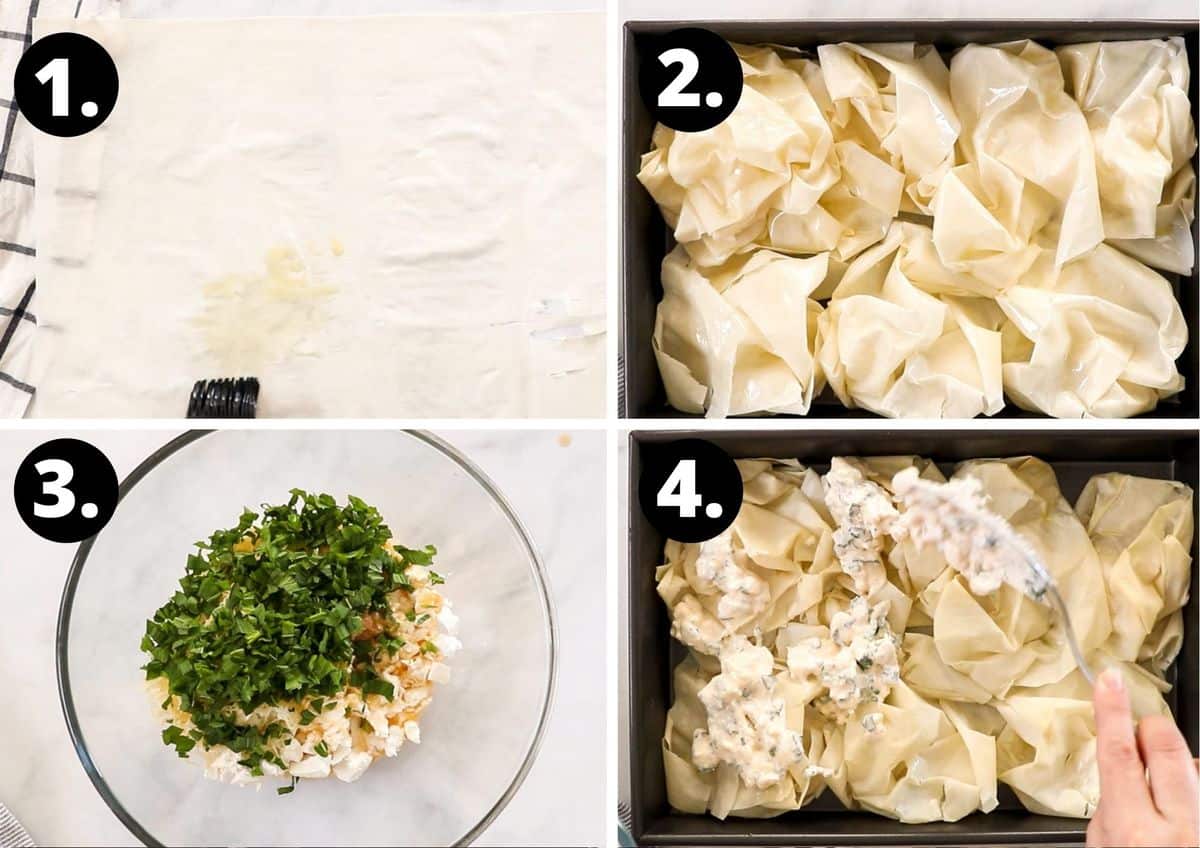
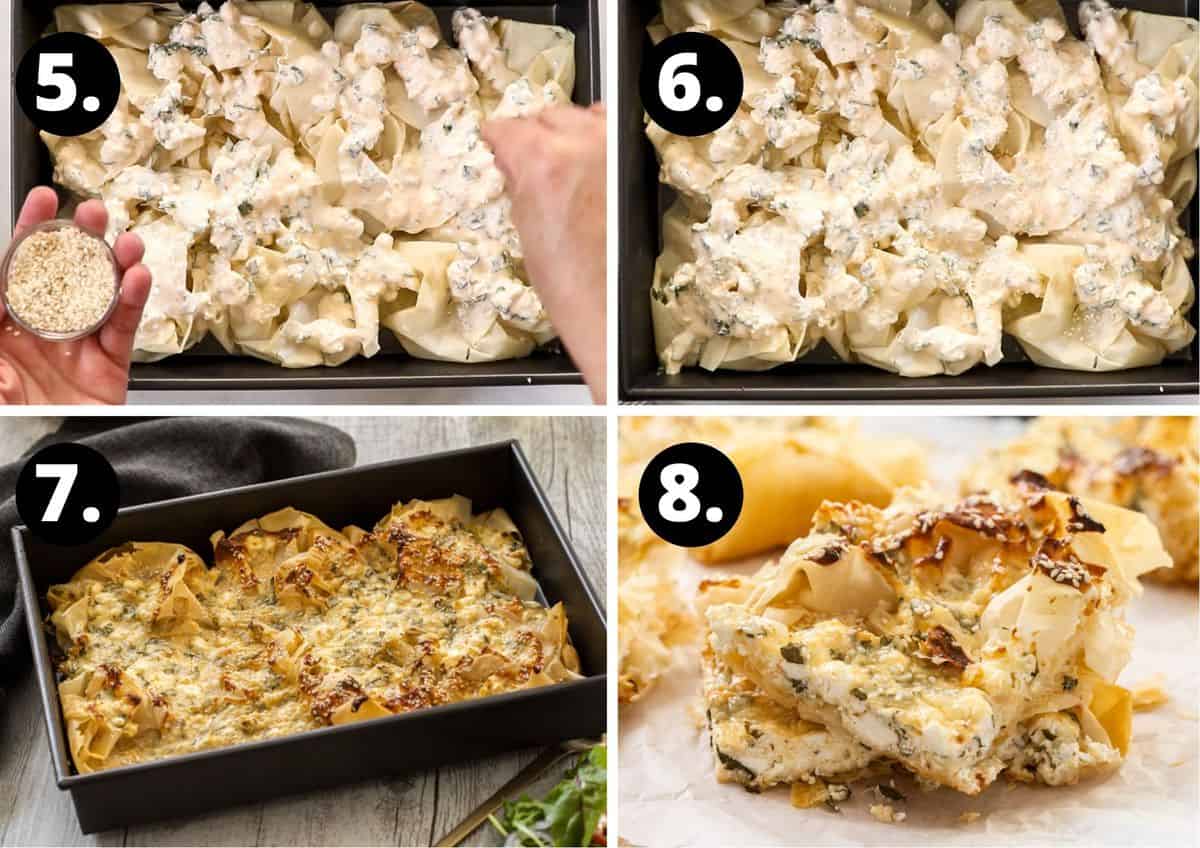
Add some olive oil to a small bowl. Remove one sheet of filo, place on your kitchen bench and brush or spray with olive oil.
Roughly scrunch the filo and place it in the base of a 23cm x 33 cm/9 inch x 13 inch baking pan.
Repeat this with 5 more sheets until the base of the pan is covered. Use another sheet, if necessary, to fill in any gaps.
Place the baking pan into the pre-heated oven and bake for 5 minutes.
Whilst the pastry is baking, add the crumbled feta, grated parmesan, lightly beaten eggs, milk, mint, nutmeg and freshly ground black pepper to a large bowl and mix well.
Remove the pan from the oven and spoon the cheese mixture over the scrunched filo.
Sprinkle on the sesame seeds (if using) and drizzle with the remaining tablespoon of olive oil.
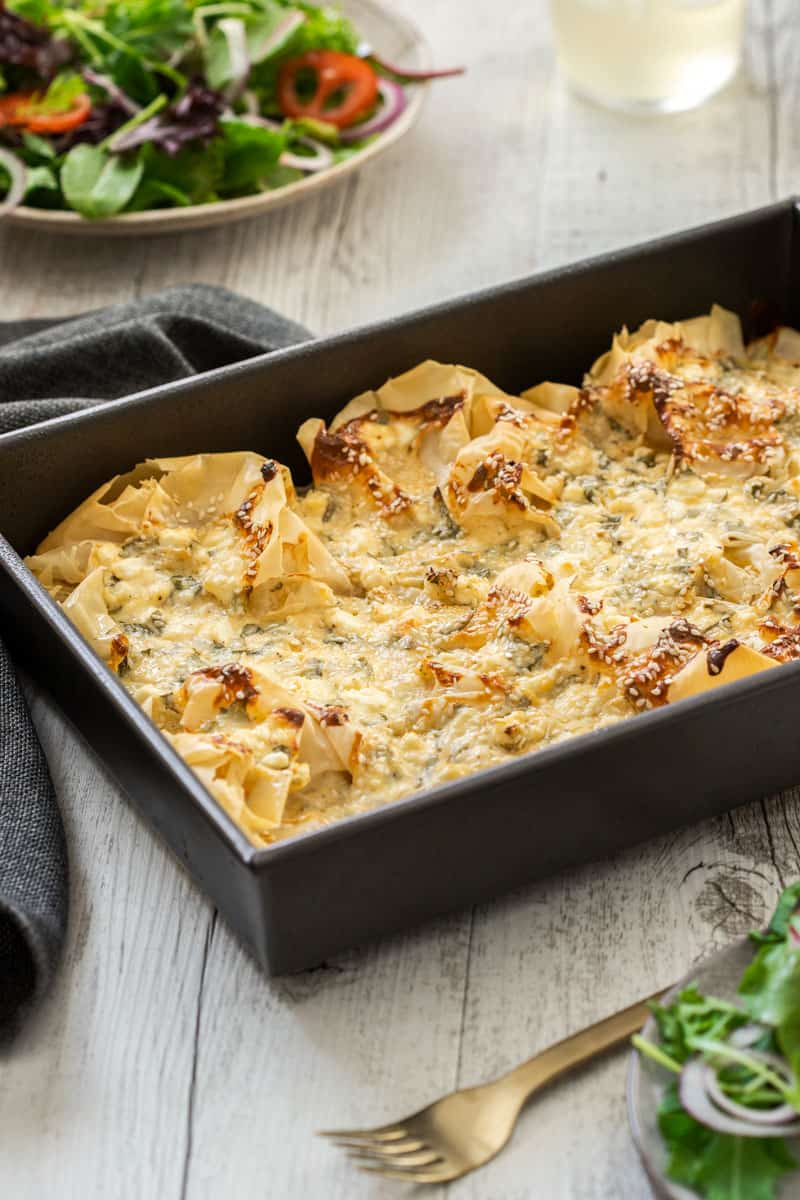
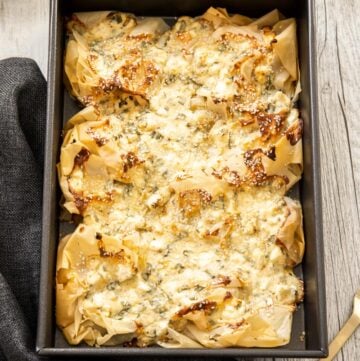
Bake about 30 minutes until the top becomes golden and the pastry crisp and crunchy.
Cut the Cheese and Herb Filo Pie into serving pieces whilst still warm.
Tips for success and FAQs:
Filo pastry is absolutely delicious, but can be quite fragile, so read on for our tips on how best to handle it.
If you buy frozen filo, you should defrost the pastry in the refrigerator for several hours before you plan to use it. There will be instructions on the packet. If you defrost it on your workbench it may become gummy. This is not a process to rush. If you try to pull it apart before it has fully defrosted, you will tear the pastry.
The main thing to know about working with filo pastry is that it contains very little fat and will dry out and be impossible to work with if you do not take a few precautionary measures.
Once you open the package you must keep the sheets of dough covered with plastic wrap or a barely damp towel whilst you're working. Never leave the pastry uncovered as it will rapidly become dry, brittle and unusable. I place the unwrapped filo on a large sheet of cling wrap on my bench. My preference is to cover the pastry with cling wrap and then a barely damp towel. The barely damp towel helps hold the cling wrap in place. If you only use a damp towel, be careful that it is barely damp; the sheets can become gummy if it is too wet. After removing each sheet for use, you must make sure the pastry has once again been covered.
Because filo does not contain much fat, when using it, you will need to brush each sheet with either melted butter or olive oil, depending on the recipe or on your personal preference.
Whilst handling the filo, some sheets may tear, but this is not a problem. This is one of the advantages of the rustic preparation; it will make no difference to the appearance or taste of the cooked pie.
You will not use the entire packet of pastry with this recipe. If your filo is fresh you can re-cover it and return it to the fridge for use within about a week. However, if you have used frozen filo, don't re-freeze it. It will become extremely dry and brittle. Cover it well with cling wrap and place in the fridge for another use, within about 5 days.
The pie will last for 3 days in the fridge well-covered, to ensure the pastry does not dry out.
Yes, you can. Allow it to cool completely and then wrap several times in cling film to ensure it does not dry out or get freezer burn. Allow it to defrost in the fridge before reheating. It will last for two months in the freezer.

More delicious recipes for you to try:
Pastry comes in many delicious forms, and these are some more recipes that we love:
- Asparagus and Parmesan Filo Rolls
- Bacon and Onion Tarts
- Ham and Cheese Puff Pastry Hearts
- Mini Bacon and Onion Pasties
- Spinach and Feta Galettes
- Blue Cheese Pastry Tarts
- Tuna Pinwheels
Filo is a wonderfully versatile ingredient. You can use it in sweet or savoury dishes and be confident of success. Properly prepared, the filo bakes up into layers that are light and airy, crisp and flaky and totally delicious.
I am sure that you will enjoy this pie. By using filo pastry, you can turn simple ingredients into something special. Serve our Cheese and Herb Filo Pie as a light meal, an appetiser, snack, or to take to a potluck or a picnic.
Alex xx
This post was originally published in January 2019. It has been updated with new photos and more information. The recipe remains the same.
I have adapted this recipe from Olive Tomato.
Cheese and Herb Filo Pie
Please note:
For accuracy, when weights are provided, we recommend weighing your ingredients. This will produce the best results. All oven temperatures listed are for fan forced.
Ingredients
- 6 sheets filo pastry See Note 1
- 2 tablespoon olive oil See Note 2
- 250 g (9 oz) feta cheese - crumbled
- ⅓ cup grated Parmesan cheese See Note 3
- 2 eggs - lightly beaten
- ¼ cup milk
- ½ cup fresh mint leaves - finely chopped See Note 4
- ¼ teaspoon ground nutmeg
- freshly ground black pepper - to taste See Note 5
For the Topping:
- 1 tablespoon sesame seeds - optional See Note 2
- 1 tablespoon extra virgin olive oil See Note 2
Instructions
- If your filo is frozen, defrost the pastry in the refrigerator for several hours before you plan to use it. There will be instructions on the packet. If you defrost it on your workbench, it may become very gummy. This is not a process to rush. If you try to pull it apart before it has fully defrosted, you will tear the pastry.If your filo is from the refrigerator, or after it has defrosted, proceed as below.
- Preheat your oven to 180 Degrees C (350 F).
- Open the packet of filo, spread it out on your workbench on a sheet of waxed paper or a sheet of cling wrap. Immediately cover the pastry with a sheet of waxed paper, cling wrap or a barely damp tea towel. - See Note 1
- Put 2 tablespoons of olive oil in a small bowl. Remove one sheet of filo, place on your kitchen bench and brush with the olive oil, or spray with olive oil if you prefer.
- Roughly scrunch the filo and place it in the base of a 23cm x 33 cm (9 inch x 13 inch) baking pan.Repeat this with 5 more sheets until the base of the pan is covered. Use another sheet of filo, if necessary, to fill in any gaps.Place into the preheated oven and bake for 5 minutes.
- Whilst the pastry is baking, add to a large bowl the crumbled feta, grated parmesan, lightly beaten eggs, milk, mint, nutmeg and freshly ground black pepper. Mix the ingredients well together.
- Remove the pan from the oven and spoon the cheese mixture over the scrunched filo.Drizzle on the additional tablespoon of olive oil and sprinkle on the sesame seeds (if using).
- Bake for about 30 minutes until the top becomes golden and the pastry crisp and crunchy.
- Cut into serving pieces whilst still warm.Serve with a tossed green salad, or our Marinated Tomato Salad. The pie is also delicious when served cold.
Video
Notes
- The filo pastry will dry out very quickly if exposed to the air. Cover it as soon as you open it. Damp tea towels are frequently recommended. However, the towel must be barely damp otherwise the pastry will become gummy. You can also use cling wrap or waxed paper. I first place the unrolled pastry onto some waxed paper or some cling wrap. Then, I cover the dough with cling wrap but for additional protection, I also use a barely damp tea towel on top of that; it helps keep the cling wrap in place.
- The Australian tablespoon is 20 ml or 4 teaspoons. In many other countries, the tablespoon is 15 ml or 3 teaspoons. Please adjust your measurements if necessary
- For the best flavour, I suggest you use Italian Parmesan and grate it yourself. I choose Grana Padano, less expensive than Parmigiano Reggiano but with fantastic flavour.
- You can use other herbs such as dill, parsley or chives or finely sliced spring onions/scallions.
- As the cheeses are quite salty, we do not add any additional salt.
- I have adapted this recipe from Olive Tomato.
- Please note, the nutritional information is based on the pie being cut into six serves. It does not include what the pie is served with. The nutritional information is an estimate only.
Nutrition Estimate:
Nutritional Disclaimer:
The nutritional information is an estimate only, and is derived from online calculators. For accurate results, we recommend calculating the nutritional information based on the ingredients and brands you use.


Ashlea C. says
My husband and I absolutely loved this pie! It's so easy and so tasty. We ate it with a small side salad and a glass (or two) of wine, thanks for sharing the recipe!
Alexandra says
Hi Ashlea!
Thank you so much for your lovely comment, and I love your serving suggestion 😉
Cheers, Alex
Audrey says
Super easy and yummy!
Alexandra says
Thank you, Audrey!
Mick says
Absolutely brilliant recipe .A new favourite. I added a few chopped black olives
Alexandra Cook says
Thank you, Mick!
The olives sound like a great addition 🙂 Alex xo
Jeff Albom says
This is so easy and quick. Delicious
Alexandra says
Happy to hear that, Jeff - thank you!
Hailey says
Quick and easy are two of my criteria for a recipe too and this totally fits the bill. Not to mention it tastes soooo good! Thanks for the tips about how to work with filo pasty, I tried the trick using a damp dish towel when I made this. I always had problems with it getting dry and this was the perfect fix.
Alexandra says
Thank you Hailey, such fabulous comments. 🙂
John Banks says
So simple, so yummy. Great snacking food or something to put in the middle of the table for parties. A real treat, really well put together. I have followed your Pinterest boards too!
Alexandra says
Thank you for the terrific feedback John and for following us on Pinterest. As you say, the filo pie is great for shared meals or parties, I do hope that you try it. 🙂
molly says
Love this.
Alexandra says
Enjoy, Molly 🙂
Areti V says
Great recipe!
Alexandra says
Thank you, Areti! 🙂