


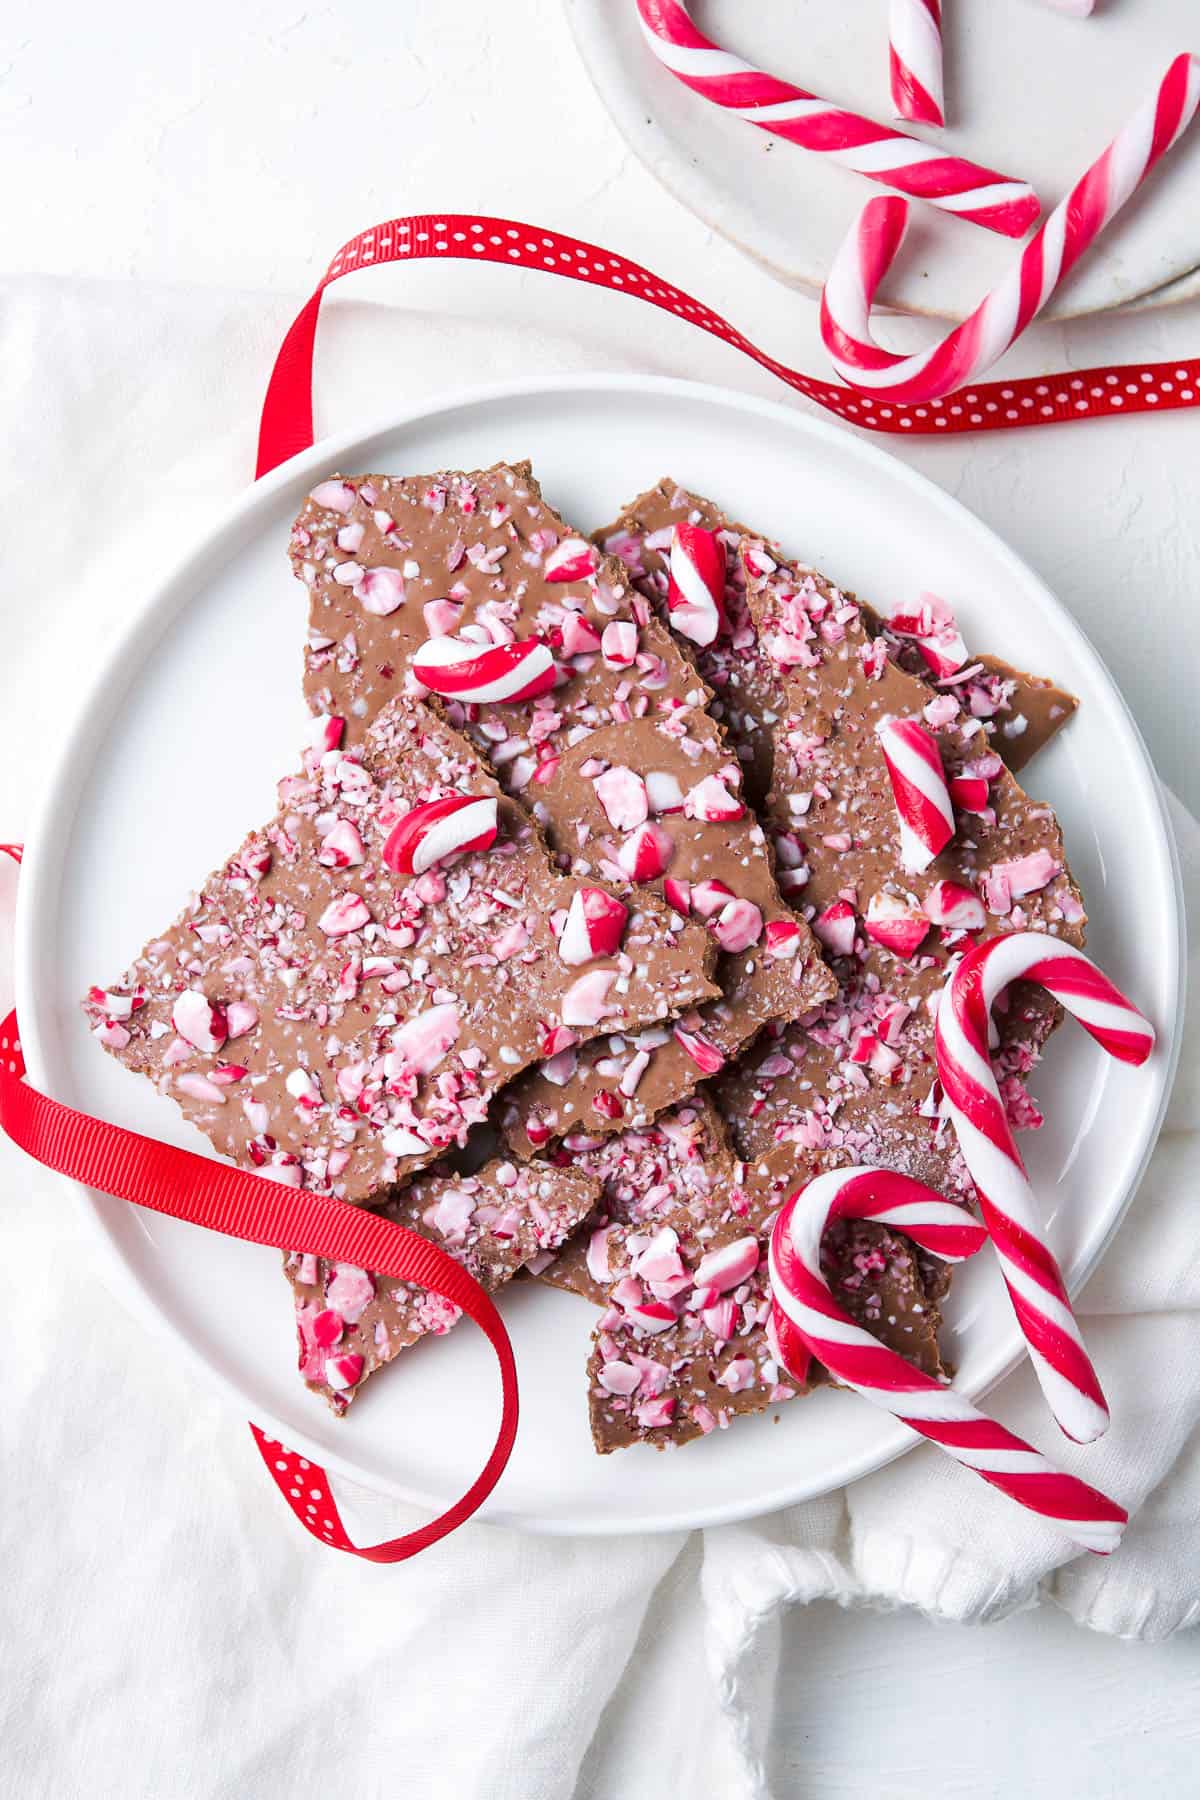
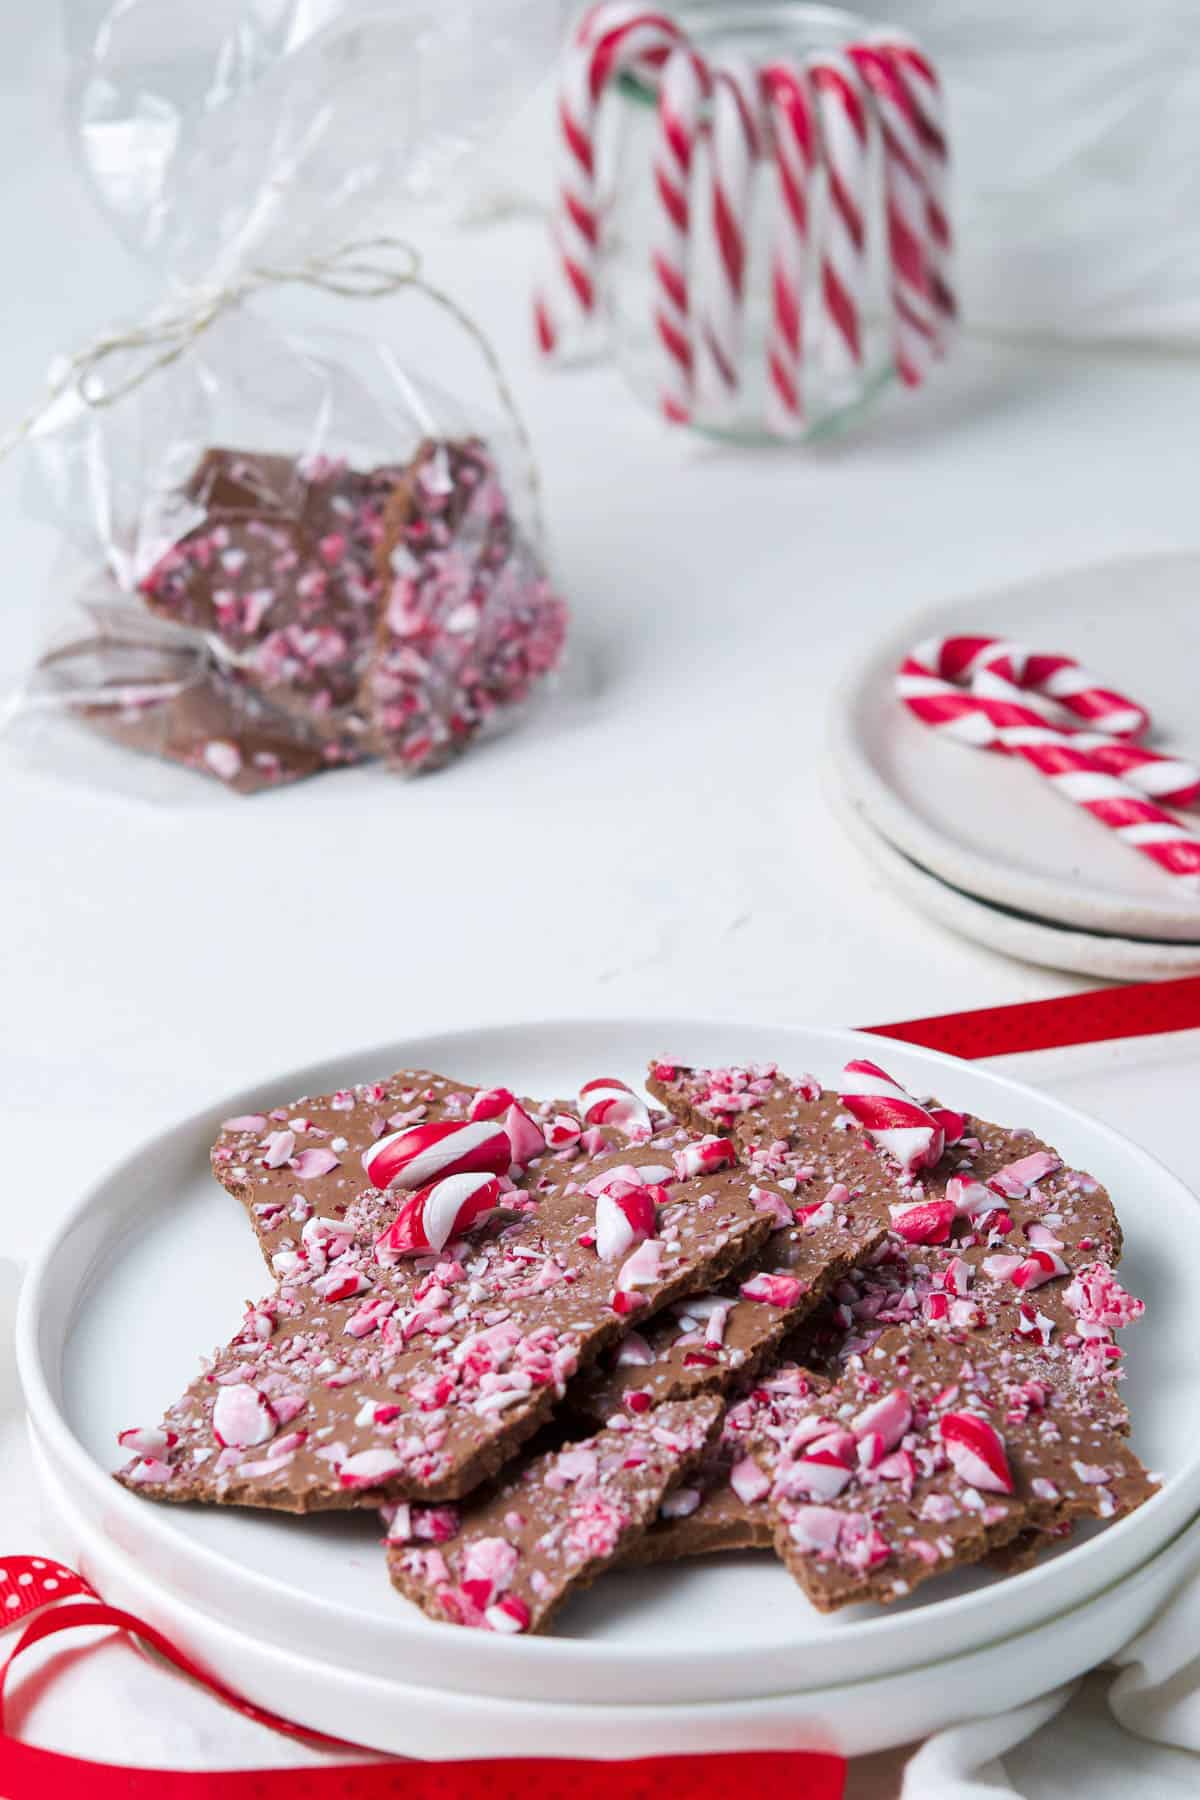
My festive Candy Cane Chocolate Bark is a great addition to your Christmas menu. The bark is so simple to make and contains just two ingredients. You simply melt some chocolate, break up some candy canes and sprinkle them on the melted chocolate. You will have delicious homemade confectionery with so little effort.
Incredibly delicious! We made three batches to give as gifts. It was hard to resist eating it all, but we have many friends who are very happy now! 🙂
– Mariana
Why You’ll Love This Recipe:
- It is enjoyed by adults and children alike and I am sure that it will become a recipe which you will make over-and-over again. In fact, I am confident that my Candy Cane Chocolate Bark will become a Christmas staple in your home as well as it is in mine.
- This is one you can make with the family; your children will love to be involved in spreading the chocolate and sprinkling the crushed candy canes. The most difficult part is waiting for the chocolate to set so they can sample the product.
- It is quickly and easily made, looks festive and has the great flavour combination of chocolate and peppermint – I’m sure they were made to be together!
- This recipe is adaptable. Scale it up or down to make as much or as little as you like.
Recipe Inspiration: we all need some easy sweet treats over the festive season, and it doesn’t get more simple than this one.
Ingredients and Substitutions:
Please see the recipe card further along in the post for exact quantities of ingredients and the full method.
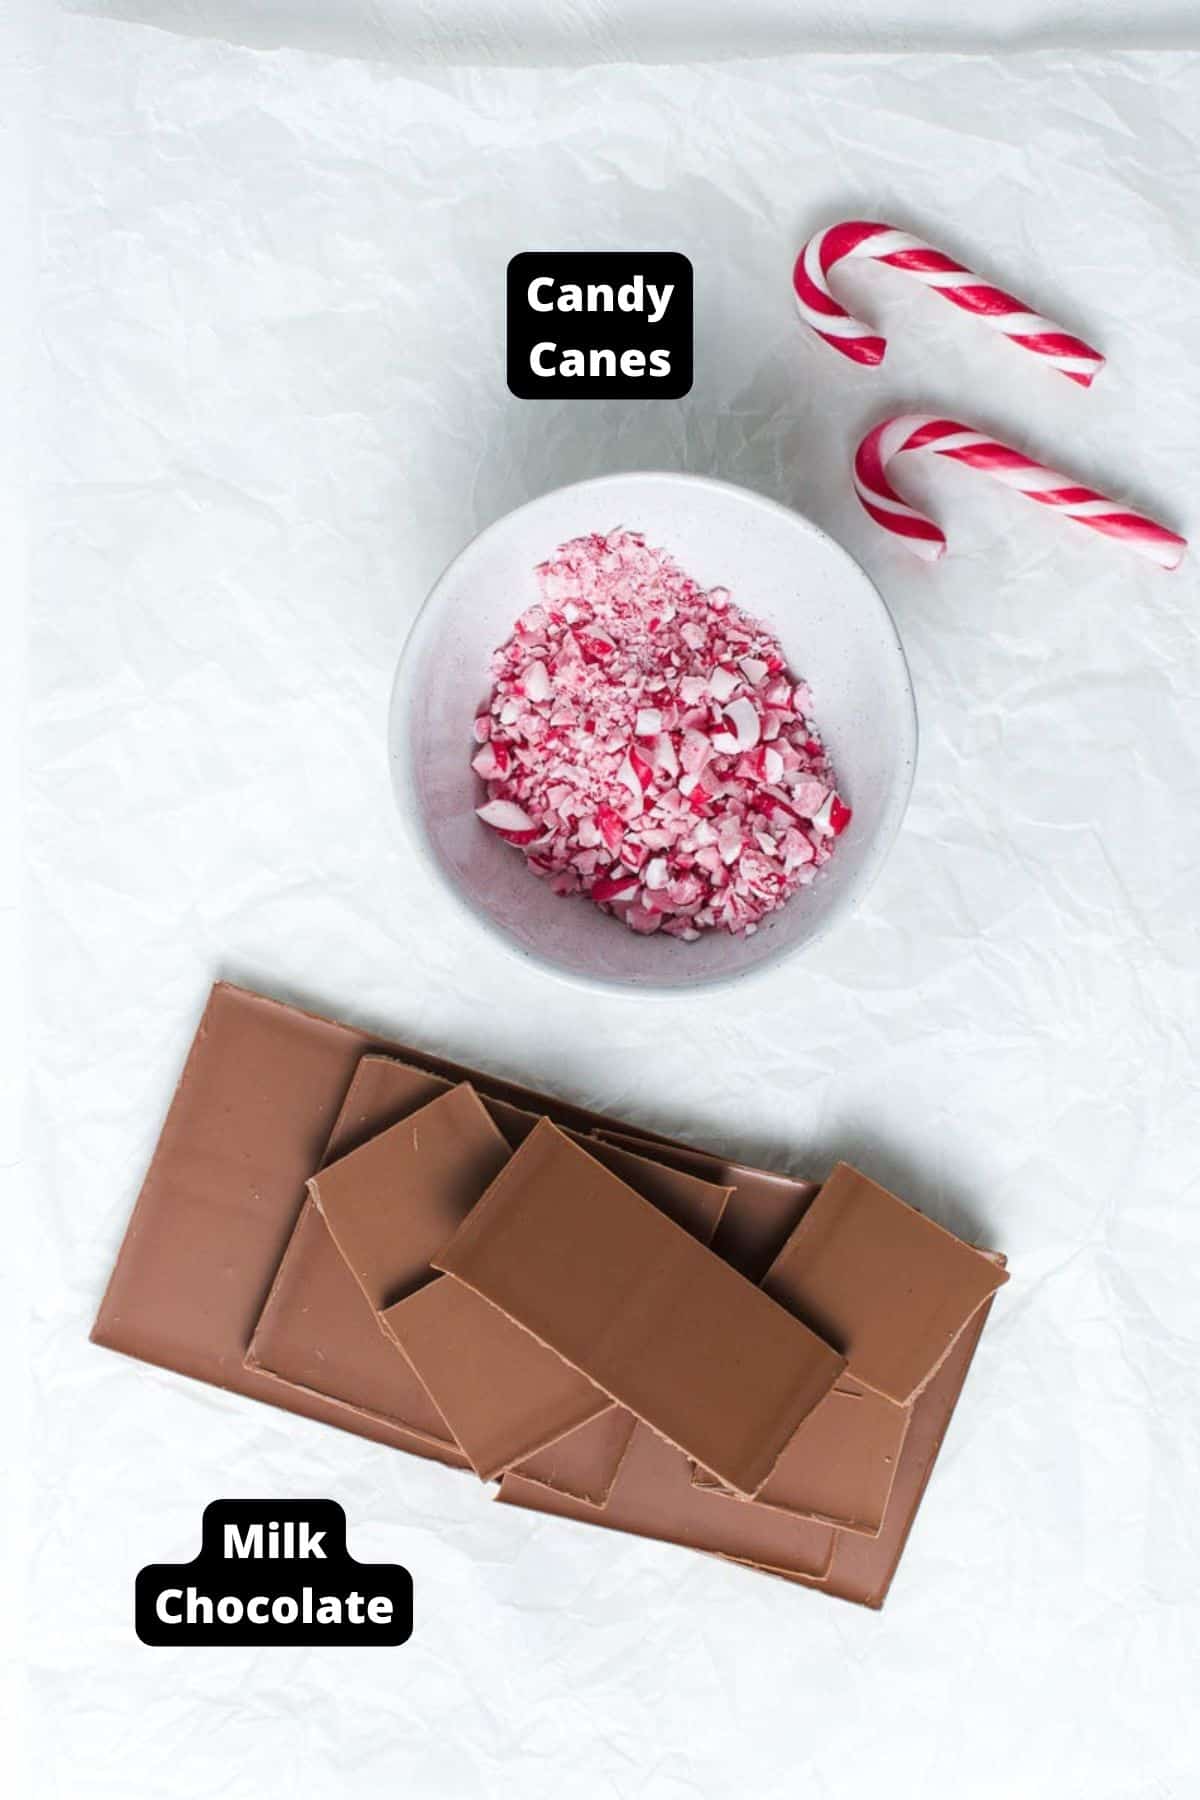
- Milk chocolate – You can use any kind of chocolate but I have chosen to use milk chocolate for this chocolate bark. With so few ingredients this is not the time to use the cheapest chocolate. Use a good quality chocolate that melts well.
- Peppermint candy canes – they come in various flavours; for this recipe we use the peppermint canes. They are delicious with chocolate, such as my Gluten-Free Chocolate Peppermint Cookies.
Variations:
Chocolate – you could also use white or dark or a combination.
Candy canes – hard peppermint candies can also be used.
How To Make Candy Cane Chocolate Bark:
Please see the recipe card further along in the post for exact quantities of ingredients and the full method.
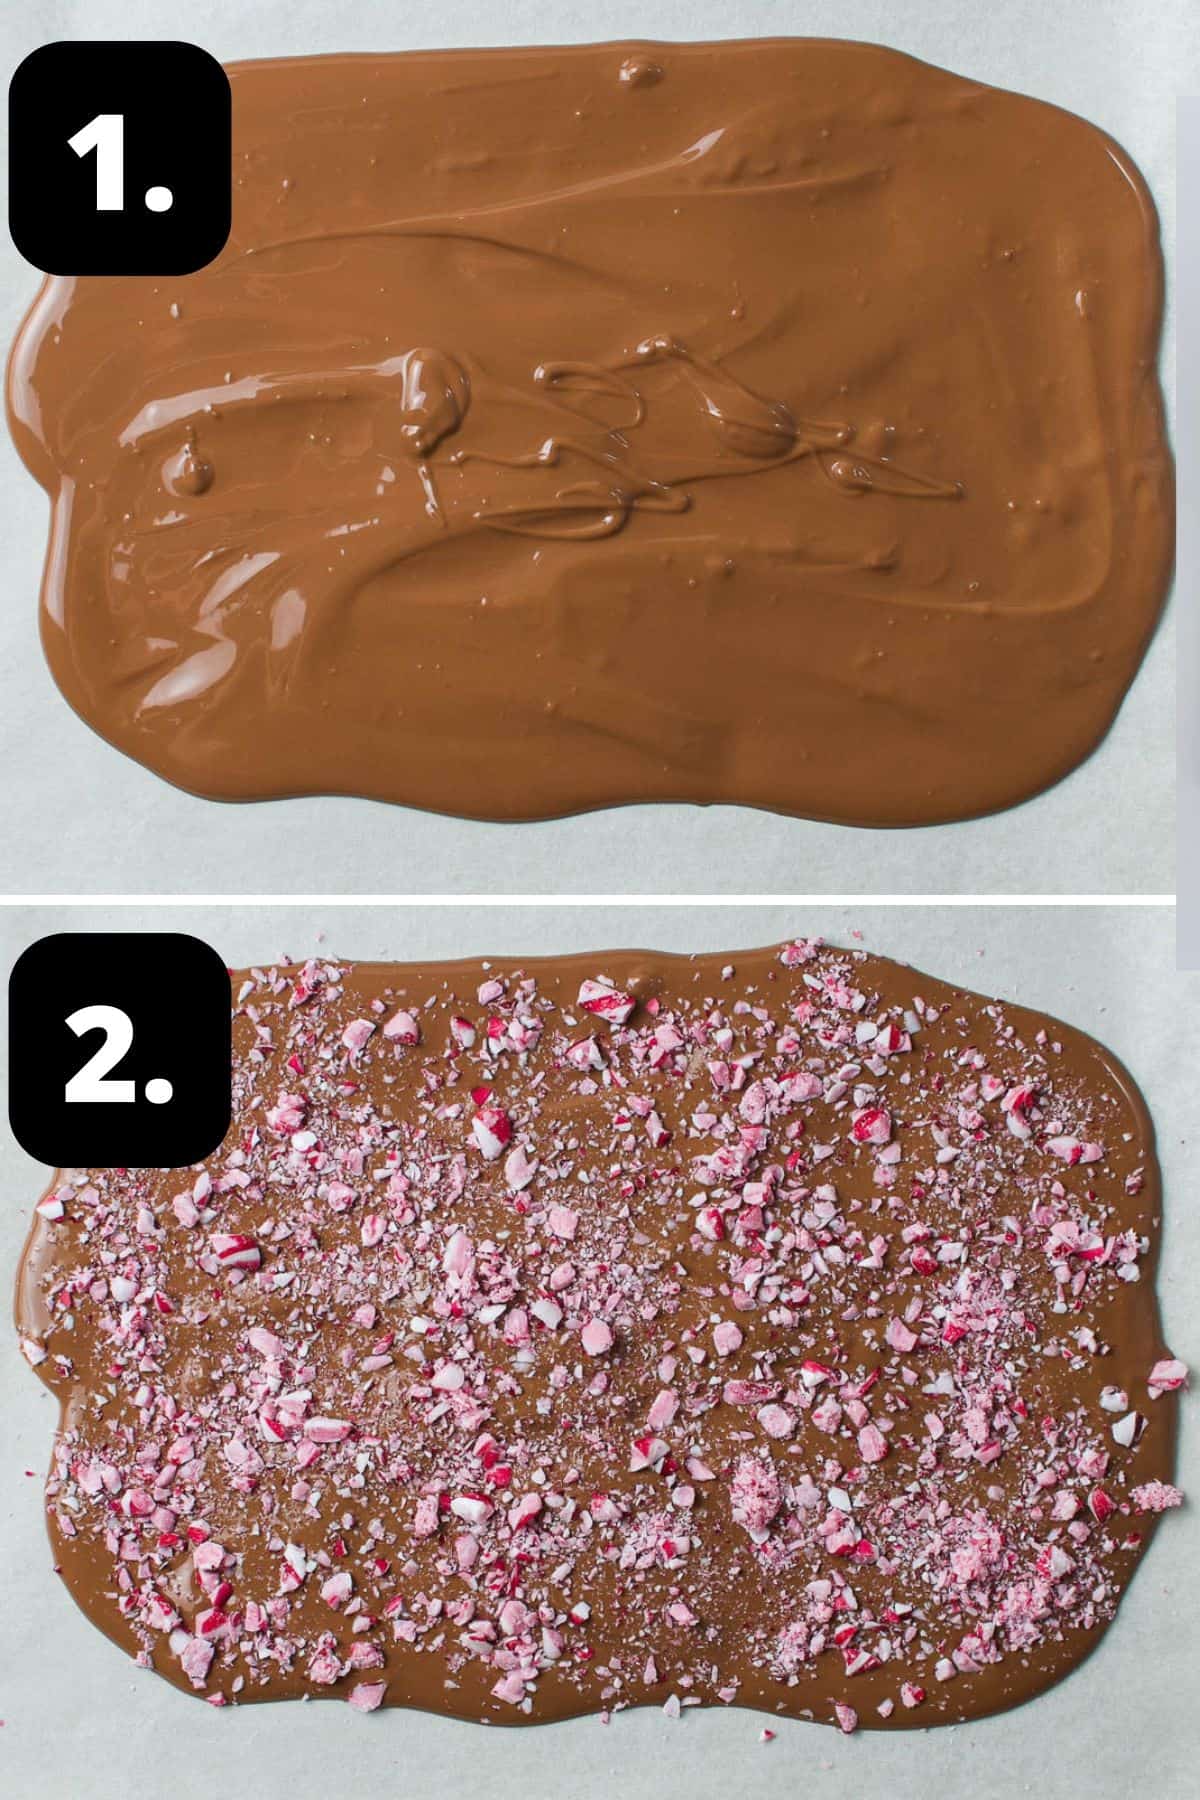
1 – Melt the chocolate:
Chop the chocolate to even-size pieces and place into the top of a double boiler or heatproof bowl set over a pan of barely simmering water making sure that the bowl doesn’t touch the water and steam does not get into the chocolate.
Alternatively, melt the chocolate in the microwave.
Pour the melted chocolate onto the prepared baking tray and spread it to an even layer.
2 – Sprinkle over candy canes:
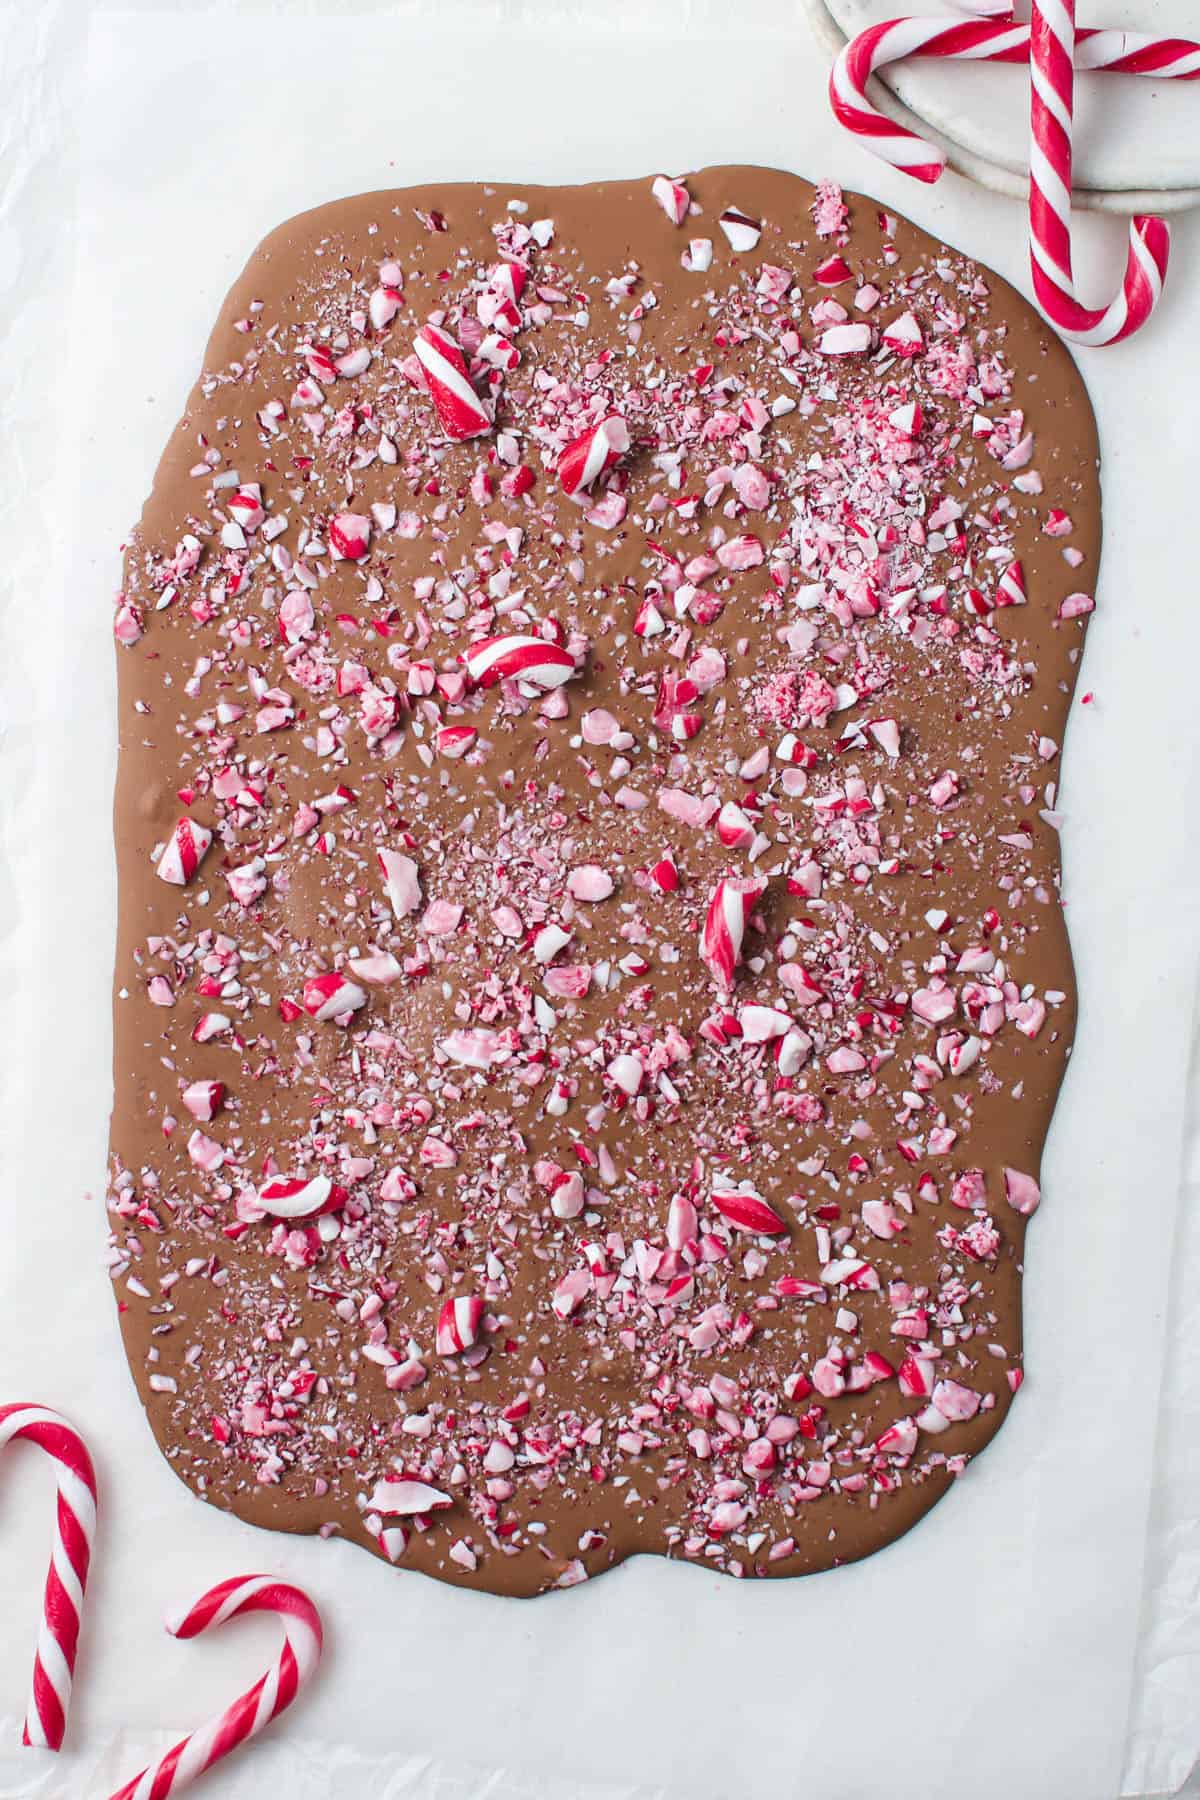
Sprinkle the crushed candy canes evenly over the chocolate.
Ideally, leave it to set at room temperature. This could take about 2 hours. However, if your kitchen is hot and the chocolate won’t set, put it in the fridge until it is set.
Hint: a combination of larger and smaller pieces of candy cane is best for texture.
Tips for Success, Storage and FAQs:
Ideally, store it in an airtight container in a cool, dark place. If possible, it is better to not store it in the fridge as moisture in the fridge may cause the chocolate to “bloom” giving it a whitish, powdery appearance. It is still safe to eat but the appearance is spoiled. However, in Australia this may not be possible so put the bark in an airtight container with a few sheets of kitchen paper on the base to absorb any moisture and store in the fridge for up to one week.
Ideally, allow the chocolate to set at room temperature. It may take up to 2 hours. However, if it is a hot day and the chocolate won’t set put it in the fridge for about 15 minutes.
My preference is the stovetop method. A double boiler gives the best control over the heat. When using a double boiler, ie, a bowl placed over a saucepan of water which has just begun to simmer, care must be taken to ensure that not a drop of water gets into the bowl or the chocolate will seize. Further, the bowl must not touch the water in the saucepan. To stir the chocolate, I use a metal spatula or spoon. Wooden spoons can retain moisture. For the best result you should not rush the process. Chocolate melts readily at a lower temperature than you may expect. Just think of what happens to it on a hot day. A high heat may cause it to burn.
You can also use a microwave. Melt the chocolate in 20 second increments, stirring occasionally. Keep an eye on it to ensure that it does not overcook.
Top Tip:
With only two ingredients, it is important to use a good quality chocolate. Our preference is for a quality cooking chocolate.
Serving Suggestions:
This is the perfect sweet treat to make over the festive season to enjoy with loved ones. You can also:
- Use this delicious Chocolate Bark as confectionery, serve with tea or coffee or enjoy as a snack.
- Use a shard to decorate a dessert – for instance, I like to serve it with our No-Churn Vanilla Ice Cream or Almond Flour Brownies.
- Gift it – it makes a lovely homemade edible gift; simply wrap some in a cellophane bag and tie with a pretty, red ribbon.
Do you love candy canes as much as I do? The very sight of candy canes in the stores thrills me with excitement and tells me that Christmas is on its way. I immediately buy a few bags and then think of the many ways to enjoy them – other than just as they come!
Alex xx
More Delicious Recipes For You To Try:


Stay in touch!
Follow me on Facebook, Pinterest, Flipboard and Instagram and subscribe to my newsletter.

Candy Cane Chocolate Bark
Please note:
For accuracy, when weights are provided, we recommend weighing your ingredients. This will produce the best results. All oven temperatures listed are for fan forced.
Ingredients
- 250 g (9 oz) milk chocolate See Note 1
- 55 g (2 oz) candy canes – (approx. 8) See Note 2
Instructions
- Line a baking tray with non-stick baking paper.
- Crush the candy canes. The best way to do this is place the candy canes in a large resealable bag and hit them with a rolling pin. You want a mix of sizes – some larger pieces rather than all fine dust.
- Chop the chocolate into even size pieces and melt in a bain marie/double boiler or heatproof bowl sat over a pan of simmering water, making sure the bowl doesn’t touch the water. Stir with a metal spoon or spatula until the chocolate has almost melted.
- Remove the bowl from the heat, taking care that no steam gets in the bowl or the mixture will seize. The residual heat will melt the remainder of the chocolate. Stir slowly until it has completely melted.If you prefer, you can melt the chocolate in the microwave – melt at 20 second intervals, stirring after each one.
- Once the chocolate has melted, pour onto the baking paper. Using a rubber or silicone spatula, spread the chocolate into an even layer until it's ½ cm (¼ inch) thick.Sprinkle the crushed candy canes over the chocolate in an even layer.
- Let cool at room temperature for 2-4 hours until completely set, or if it is a warm day, place it in the fridge until set. (See Note 3.)
- Using your hands or a sharp knife, break or chop into 18-20 pieces.
- Store in an airtight container for up to 5 days, in the refrigerator if necessary. If storing in the refrigerator, I suggest you place several layers of kitchen paper in the base to help absorb excess moisture. (See Note 4.)
Notes
- Chocolate: use the best quality chocolate that you can – this will produce the best result.
- Candy canes: I like original, peppermint flavoured candy canes for this recipe.
- Storage: ideally, store it in an airtight container in a cool, dark place. If possible, it is better to not store it in the fridge as moisture in the fridge may cause the chocolate to “bloom” giving it a whitish, powdery appearance. It is still safe to eat but the appearance is spoiled. However, as it is Summer in Australia for the festive season, this may not be possible. If storing in the fridge, put the bark in an airtight container with a few sheets of kitchen paper on the base to absorb any moisture and store in the fridge for up to one week.
Nutrition Estimate:
Nutritional Disclaimer:
The nutritional information is an estimate only, and is derived from online calculators. For accurate results, we recommend calculating the nutritional information based on the ingredients and brands you use.
Molly
So easy, so festive! Love this recipe for a holiday treat.
Alexandra
Hi Molly, I am so pleased that you like the Candy Cane Chocolate Bark. Thank you for letting me know. 🙂
Mariana
Incredibly delicious! We made three batches to give as gifts. It was hard to resist eating it all, but we have many friends who are very happy now! 🙂
Alexandra
Hi Mariana!
Thank you so much – I am so happy you enjoyed it, and what a lovely gift it makes!
Molly
So easy and such a festive recipe! Beautiful for holiday gifting too.
Alexandra
Thank you so much, Molly!
kaka
My kids loved it! This is so easy to make, no hassle recipe! One more thing for dessert section in my Christmas party! Thank you
Alexandra
So happy to hear that – thank you for letting me know!