


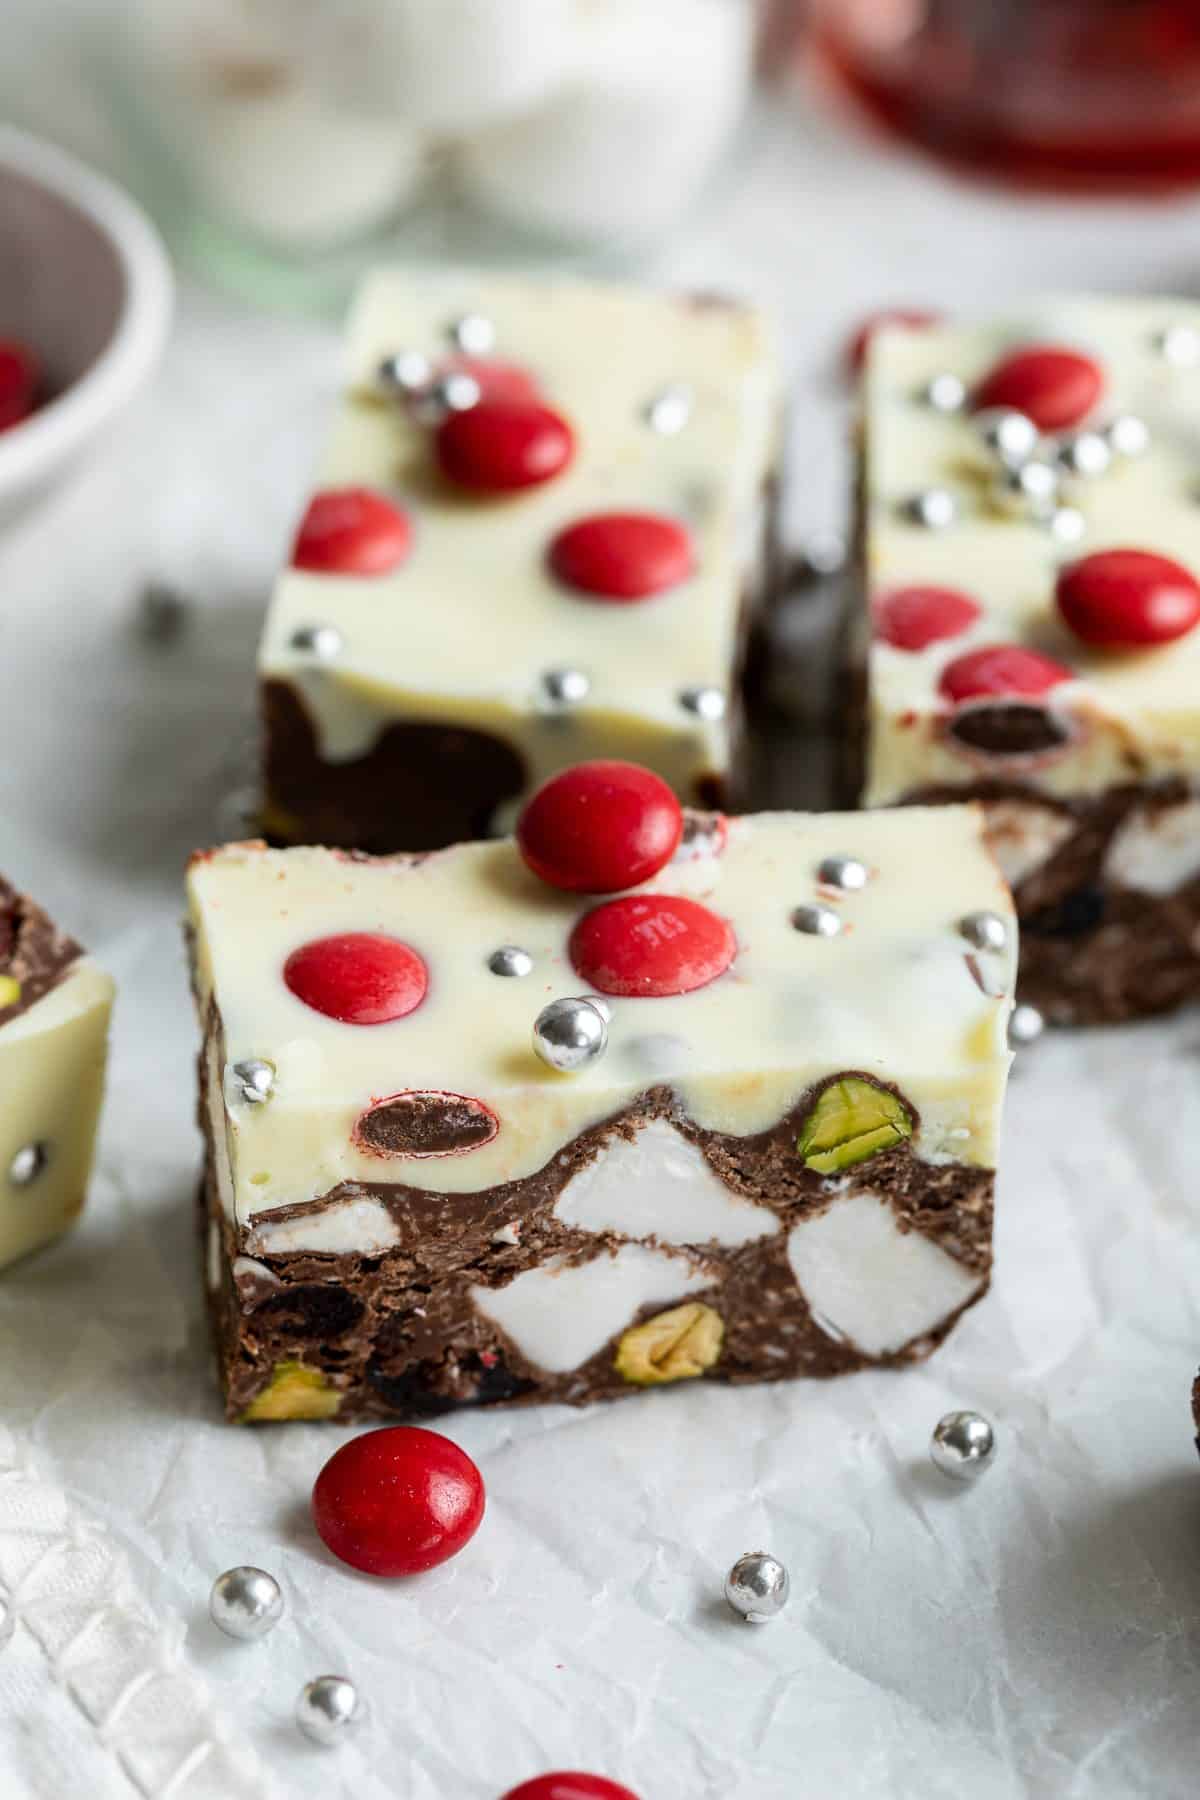
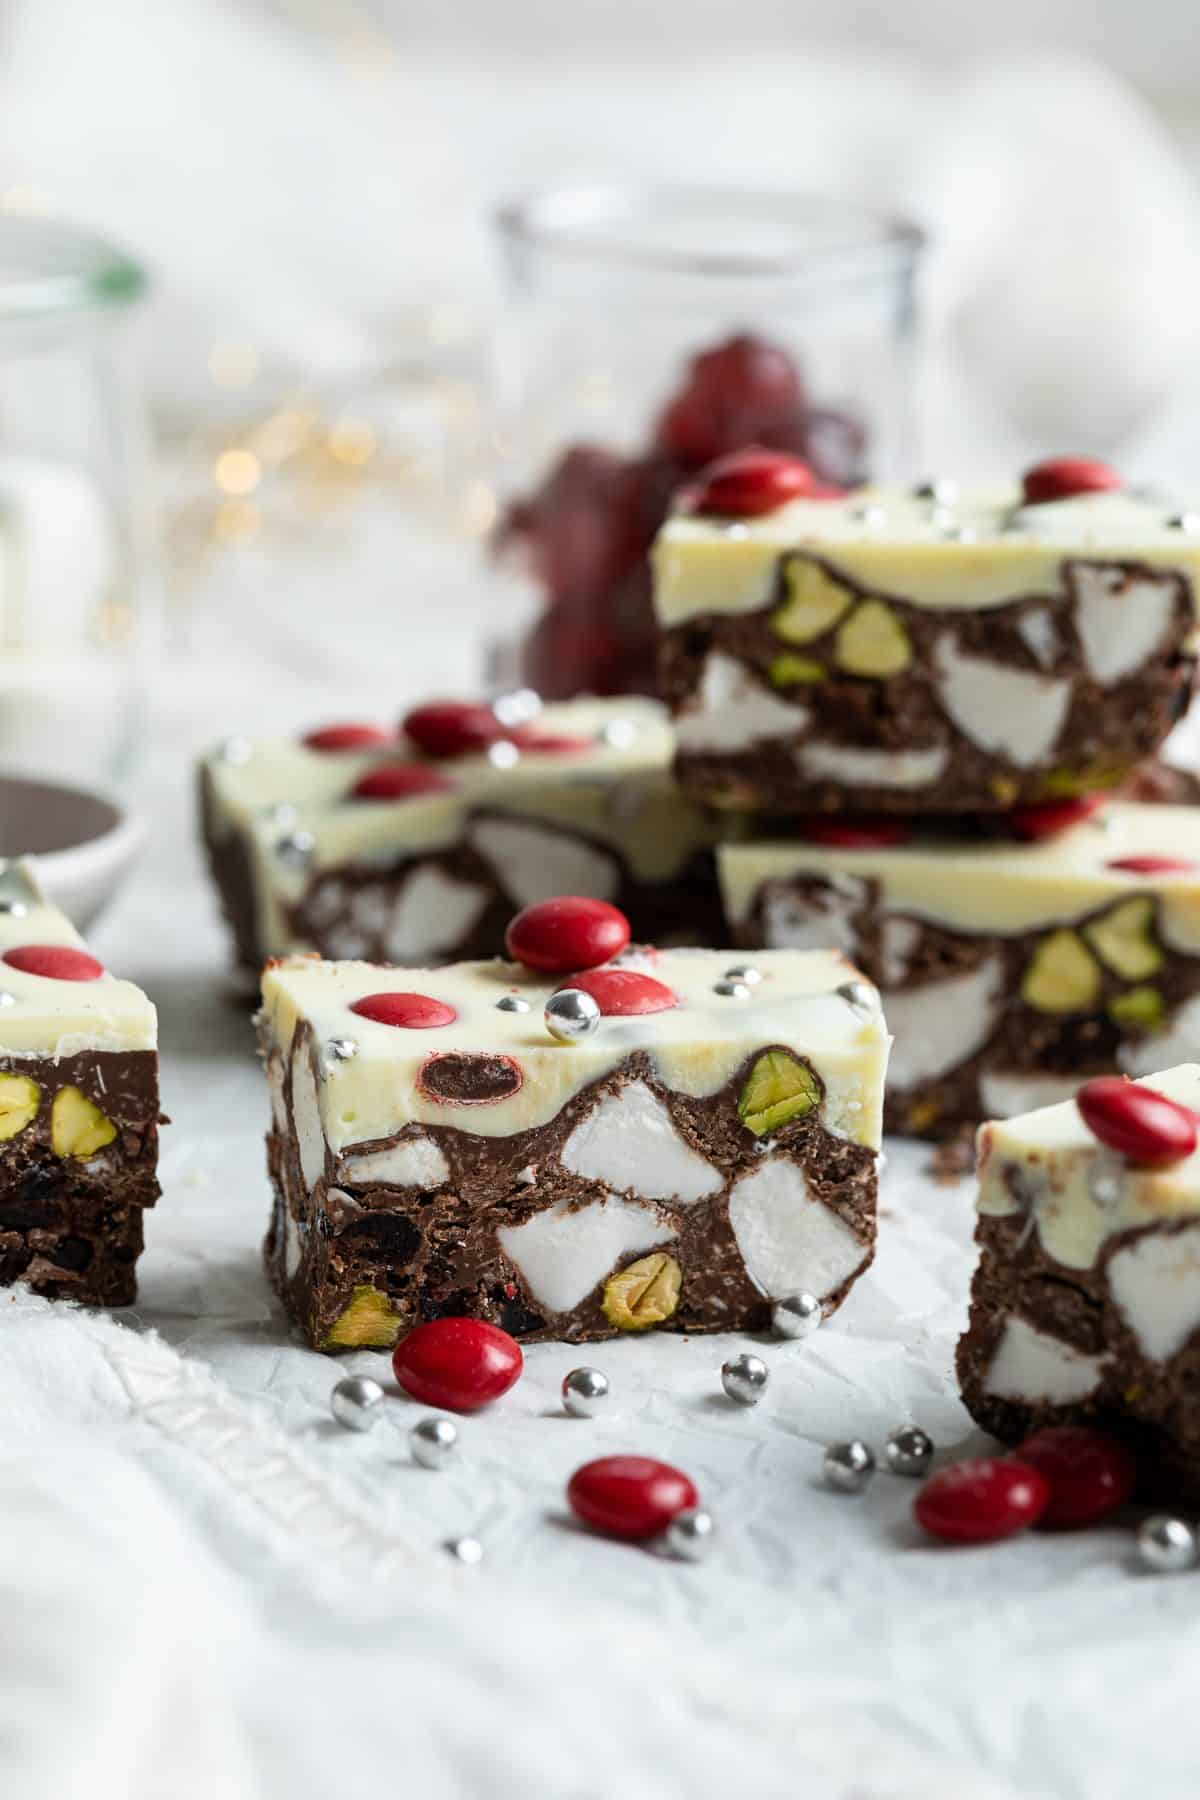
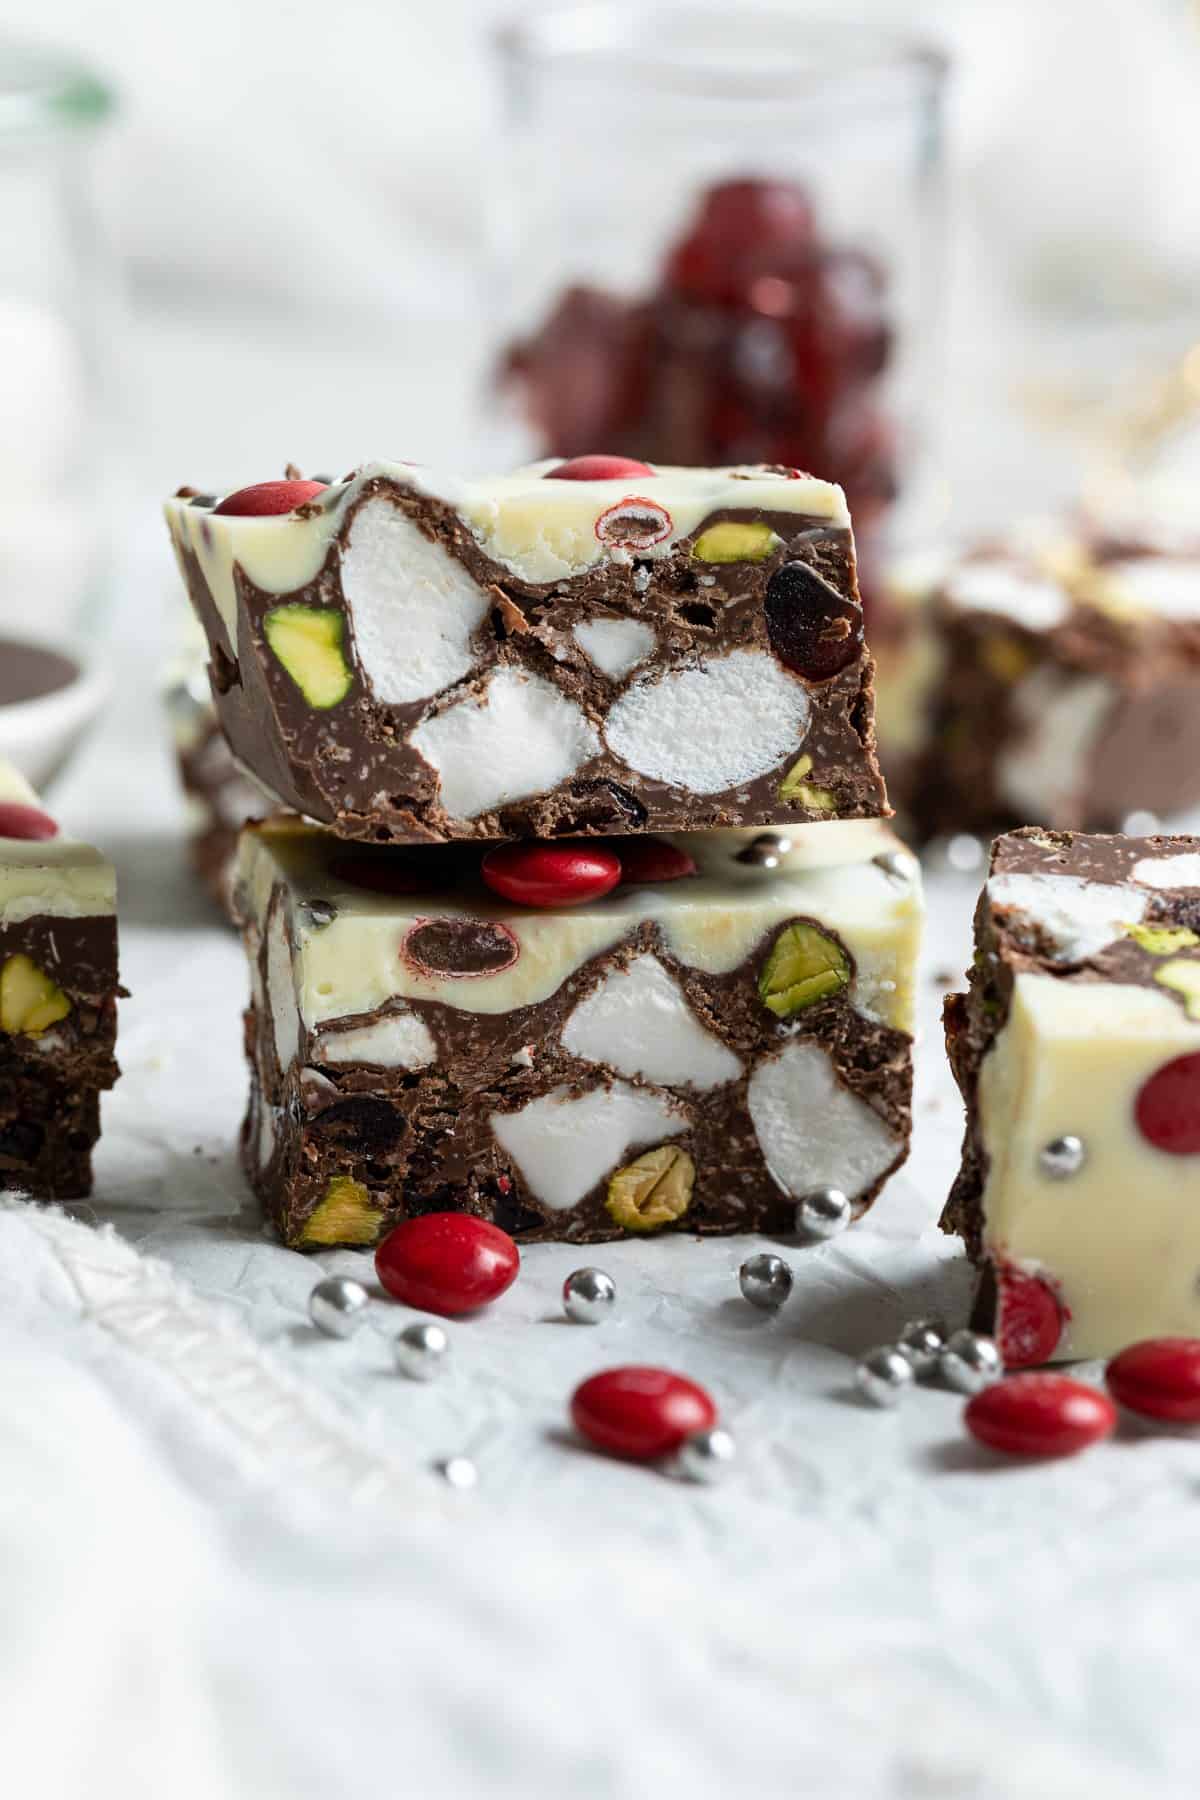
My festive Christmas Rocky Road is an ideal sweet treat or edible gift. This simple to prepare recipe is a favourite no-bake dessert for chocolate lovers. A delicious dark and milk chocolate base is filled with marshmallows, cherries, coconut and pistachios. The slice is topped with creamy white chocolate and decorated for the festive season.
Delicious. I added some extra cherries on top instead of the lollies, but otherwise followed the recipe. Will be making for gifts.
– Linda
Why You’ll Love This Recipe:
- Christmas Rocky Road is a delicious sweet treat that anyone can make! In fact, it requires very little culinary ability. If you can melt chocolate, you can make this popular slice. And if you have not melted chocolate before, I will tell you how to go about it.
- The slice is no-bake. Simply chop your ingredients, melt the chocolate and mix together. The hardest part is waiting for the slice to set!
- It is a good recipe to make with the whole family.
- This Christmas Rocky Road is ideal to make in advance. Great to have on hand for when guests stop by over the festive season, or you need an edible gift to take to someone’s house!
- It can be decorated to your liking – I have used some red and silver treats to decorate, but crushed candy canes, chocolate shavings or Christmas sprinkles would also work well!
- It is perfectly festive – we also love to make Rocky Road at Halloween and Easter.
Recipe Inspiration: we always make rocky road for the festive season. This is a fun version that can be customised to your liking.
Ingredients and Substitutions:
Please see the recipe card further along in the post for exact quantities of ingredients and the full method.
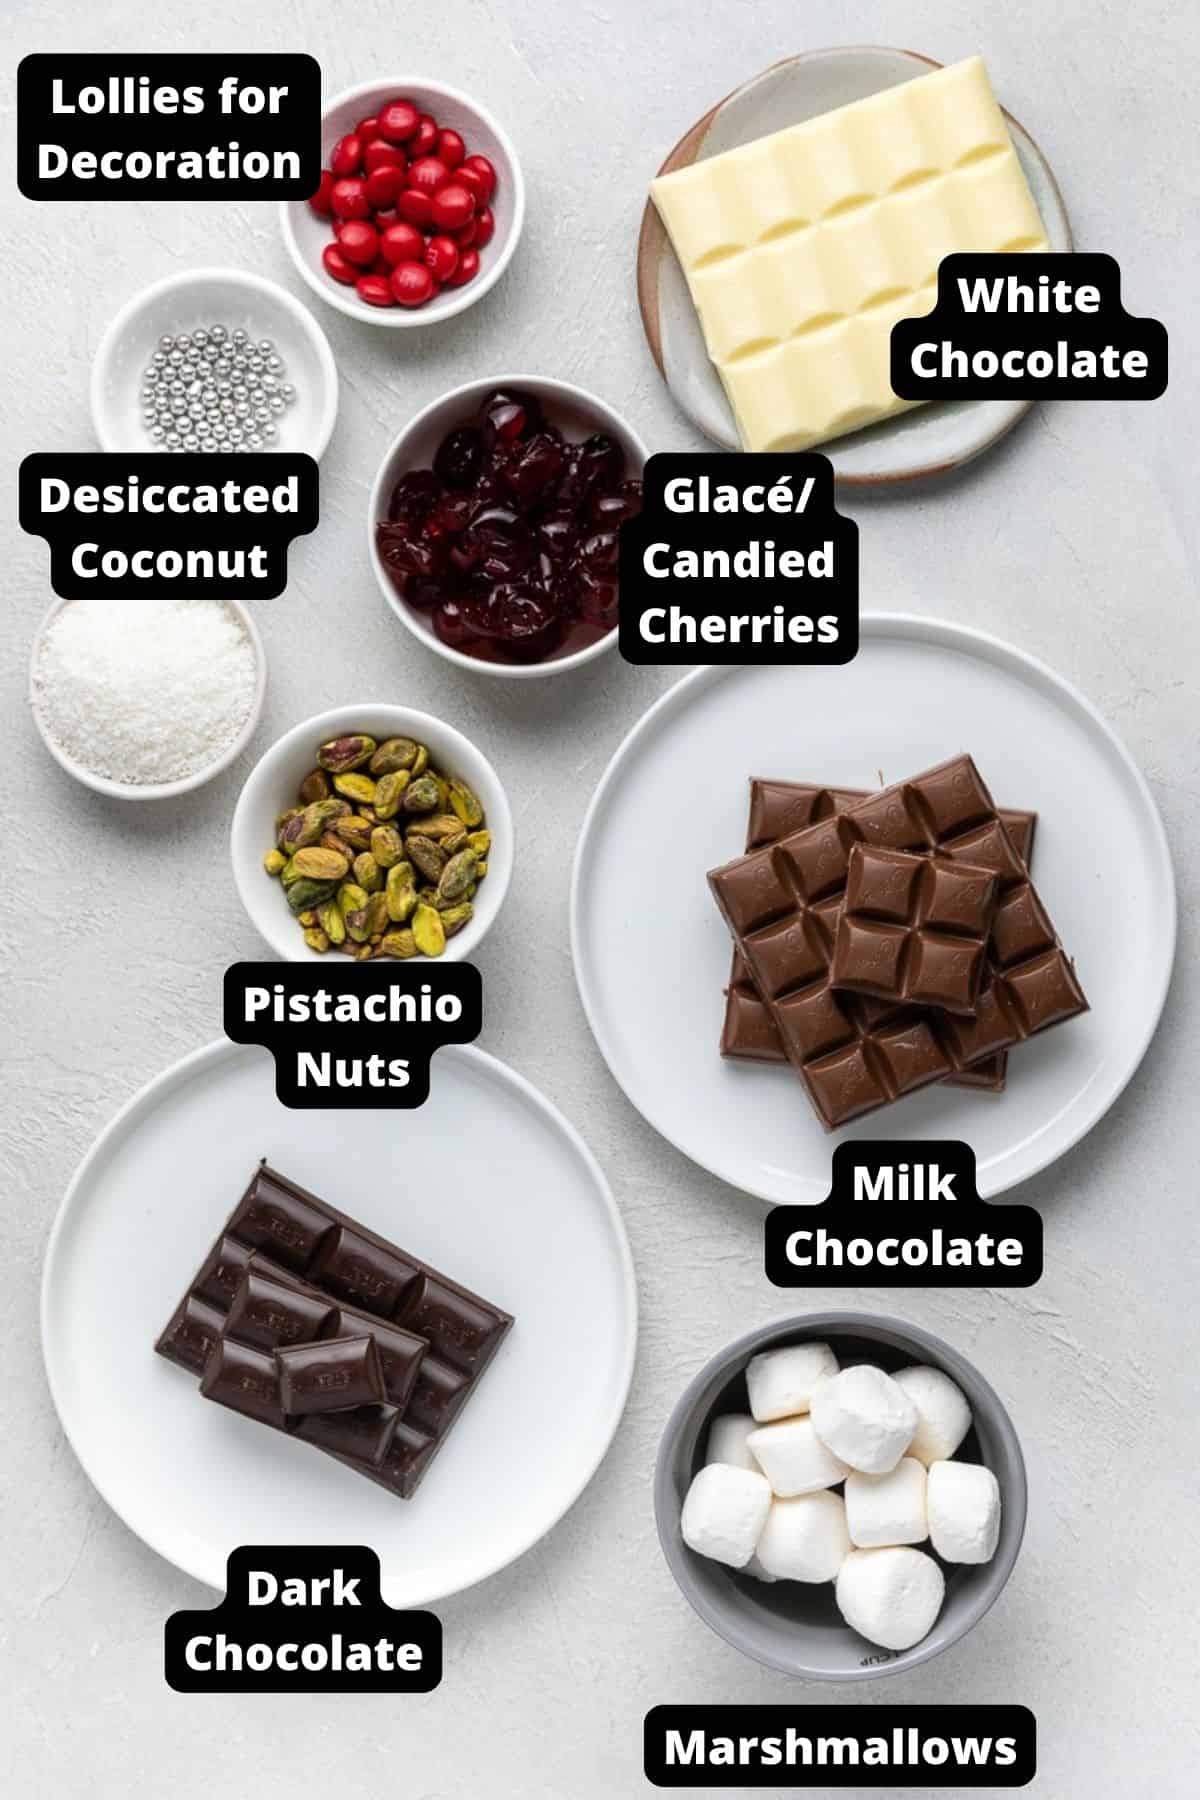
- Milk, dark and white chocolate – for the best result, use good quality chocolate, one that is designed for melting. We use a quality cooking chocolate for this recipe.
- Desiccated coconut – desiccated is dried and finely ground unsweetened coconut, available in supermarkets. It is not the same as shredded or flaked coconut.
- Marshmallows – I use white marshmallows for colour contrast.
- Glacé cherries – sometimes known as candied cherries, I use the red ones.
- Pistachios – add great texture and colour. If you prefer it to be nut-free you can substitute it with a sweet biscuit/cookie of your choice, broken into small pieces.
- Decorations – I have used red M&M’s and silver cachous.
Variations:
Nuts – peanuts, chopped hazelnuts or almonds are great substitutions.
Decorations – customise to your liking.
Glacé cherries – dried cranberries or another type of candied fruit. You could also use some raspberry lollies.
How To Make Christmas Rocky Road:
Please see the recipe card further along in the post for exact quantities of ingredients and the full method.
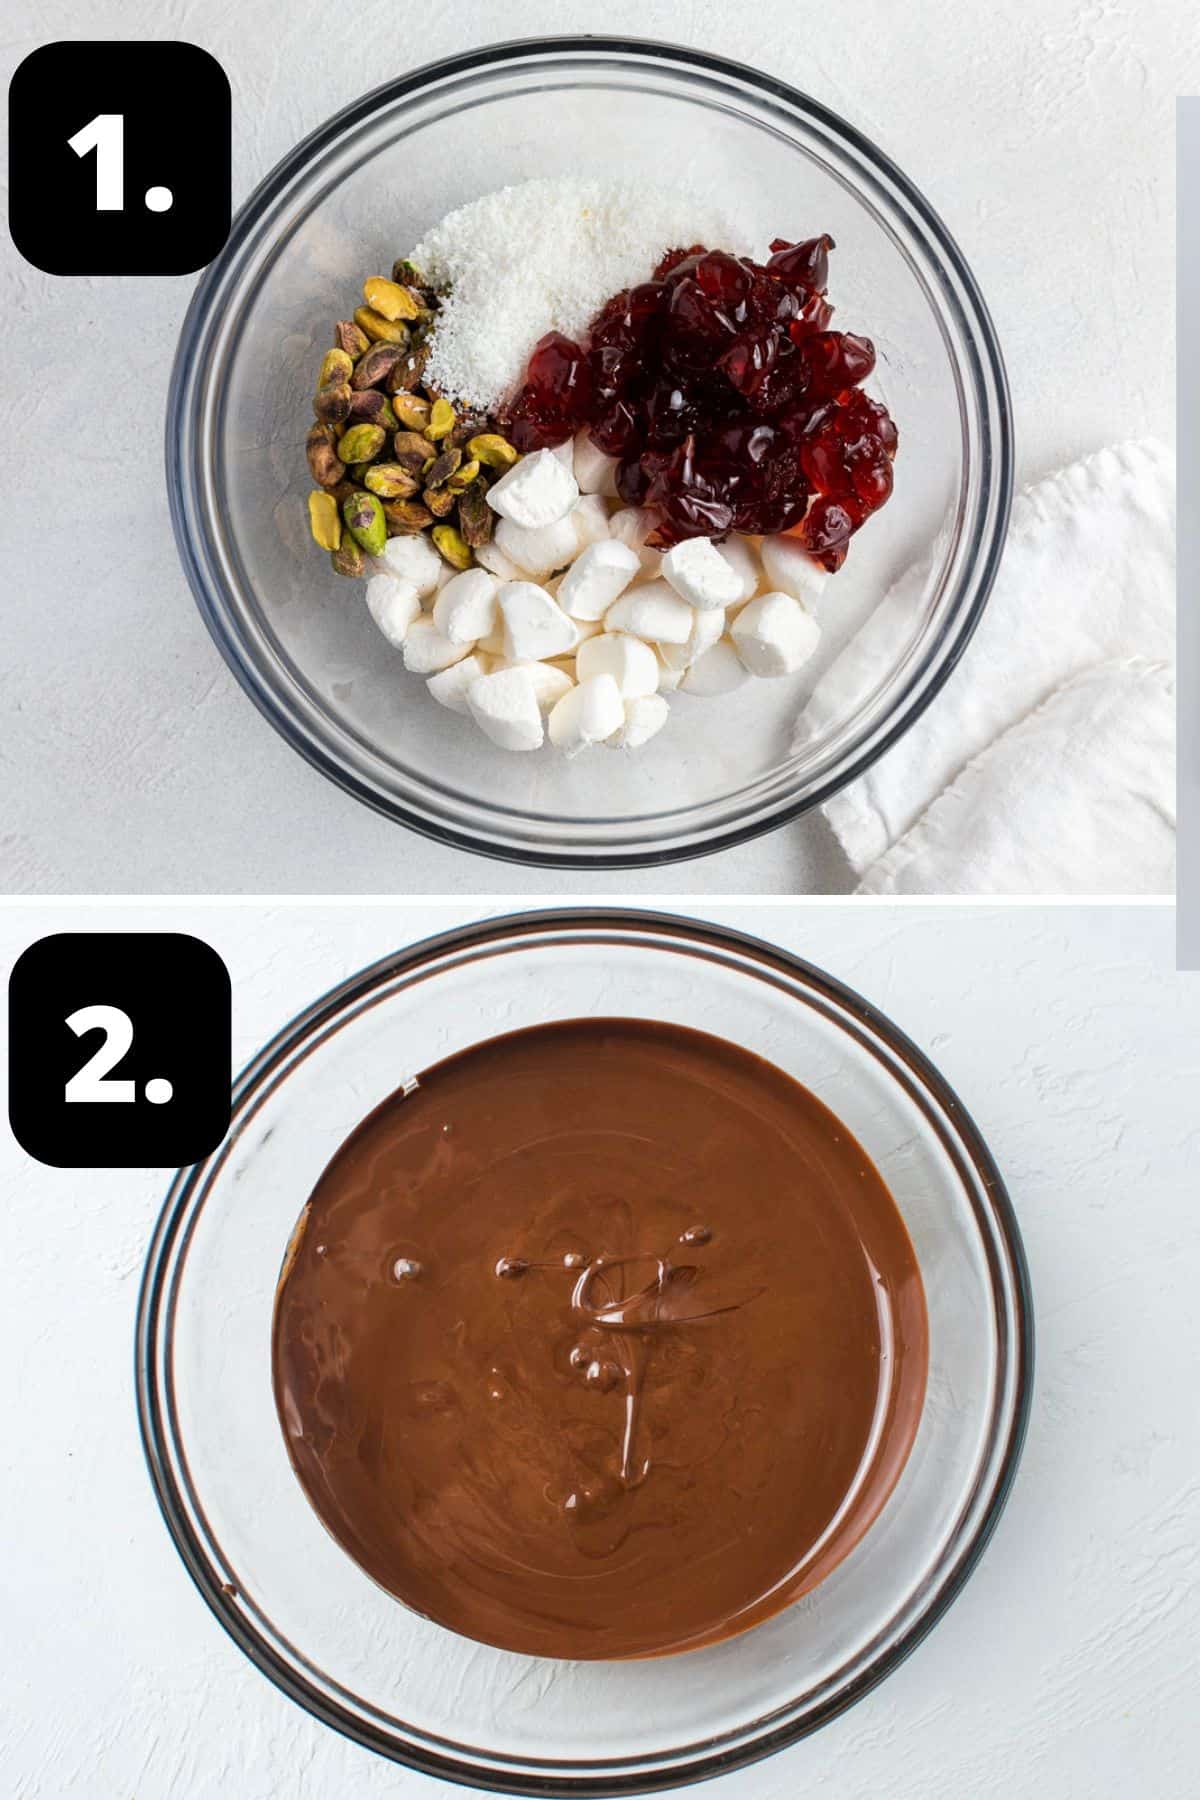
1 – Prepare your ingredients:
Make sure that your ingredients are prepared for the Christmas Rocky Road before you begin to melt the chocolate. Place the coconut, quartered marshmallows, pistachios and halved glacé cherries into a large bowl.
2 – Melt your chocolate:
Chop the chocolate to even-size pieces and place into the top of a double boiler or heatproof bowl set over a pan of barely simmering water making sure that the bowl doesn’t touch the water and steam does not get into the chocolate.
Stir with a metal spoon or spatula occasionally until the chocolate has almost melted. Remove it from the heat; the residual heat will melt the remaining chocolate. Give it a final stir.
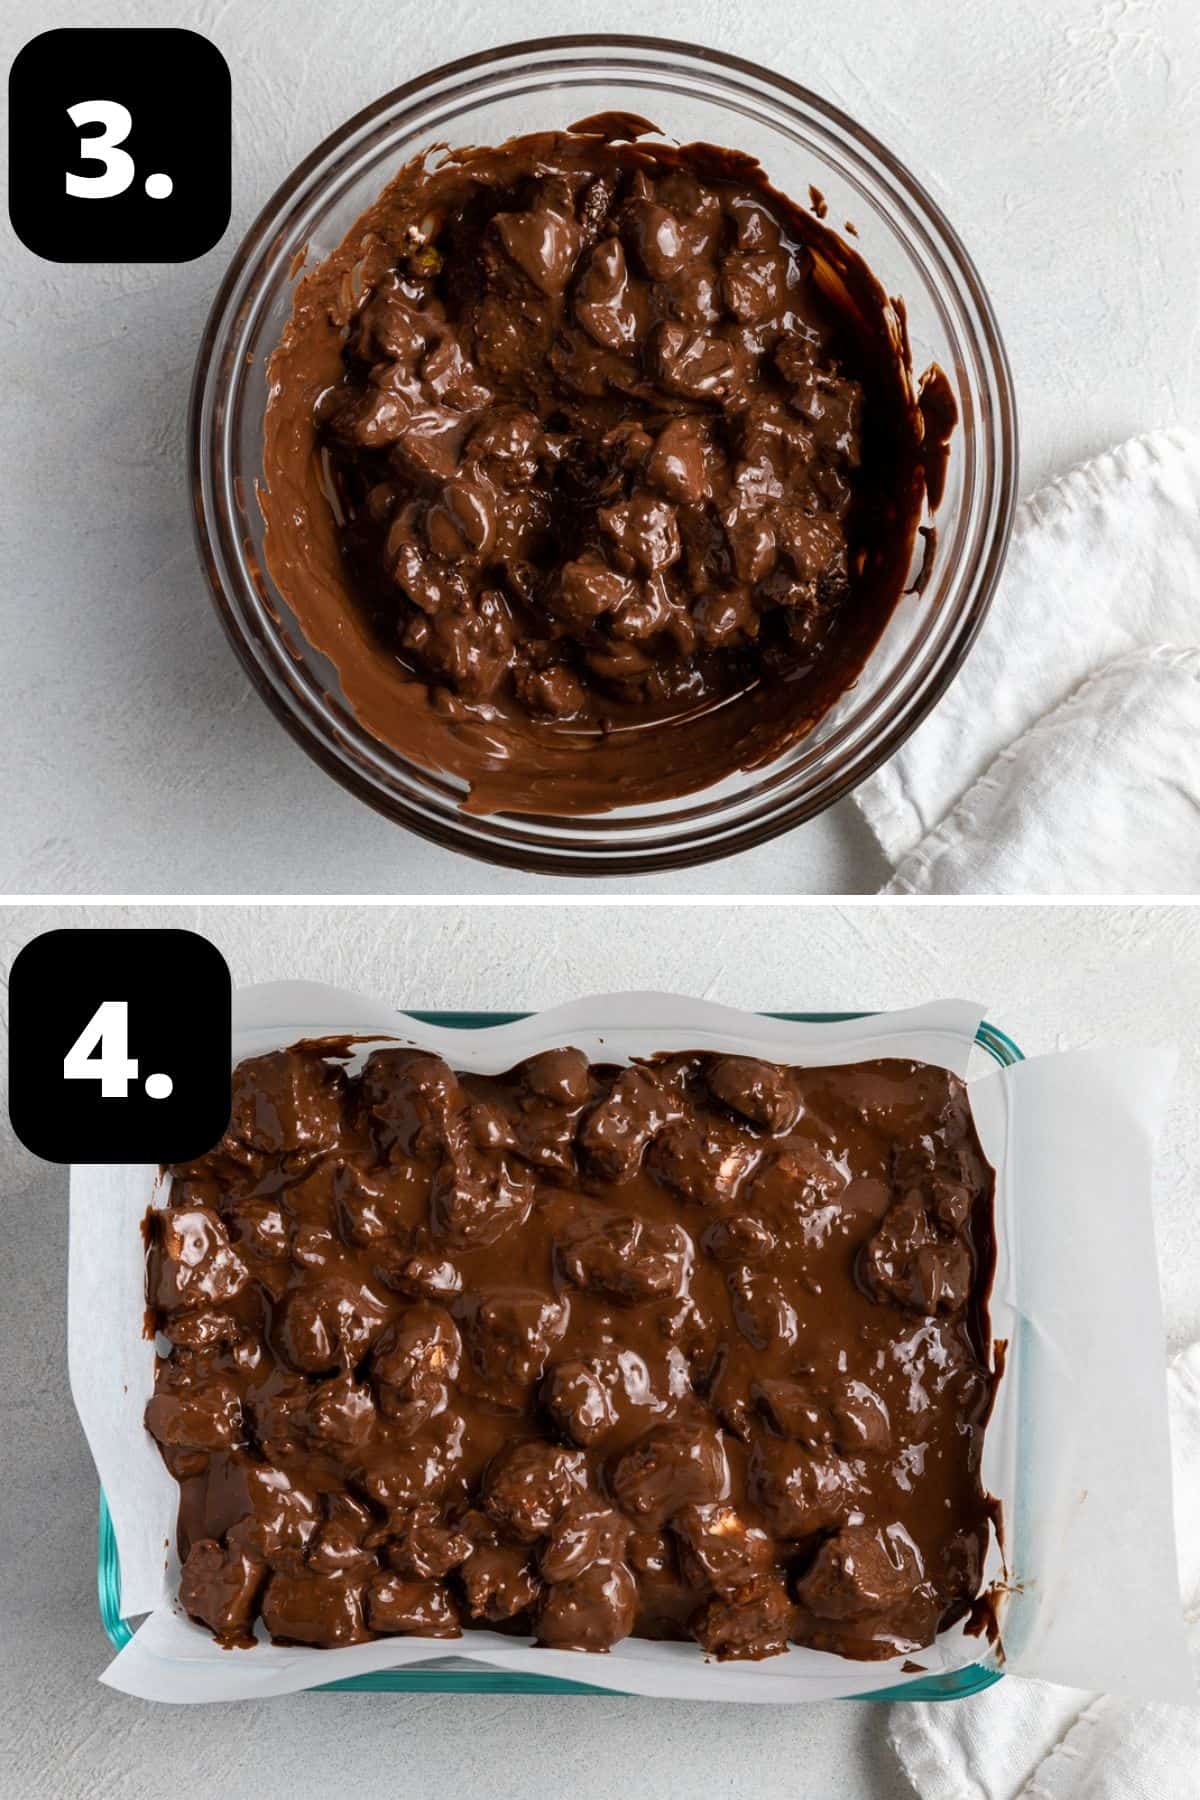
3 – Combine your ingredients:
When the chocolate has melted, let it cool for a minute or two then add to the bowl and stir well to combine the ingredients. If it is too warm it may begin to melt the marshmallows.
4 – Add to your prepared dish:
Add the mixture to the prepared tin and press down to flatten with a metal spatula or spoon. Place in the fridge for 30 minutes.
In a clean bowl, add your white chocolate pieces and melt. Set it aside to cool slightly.
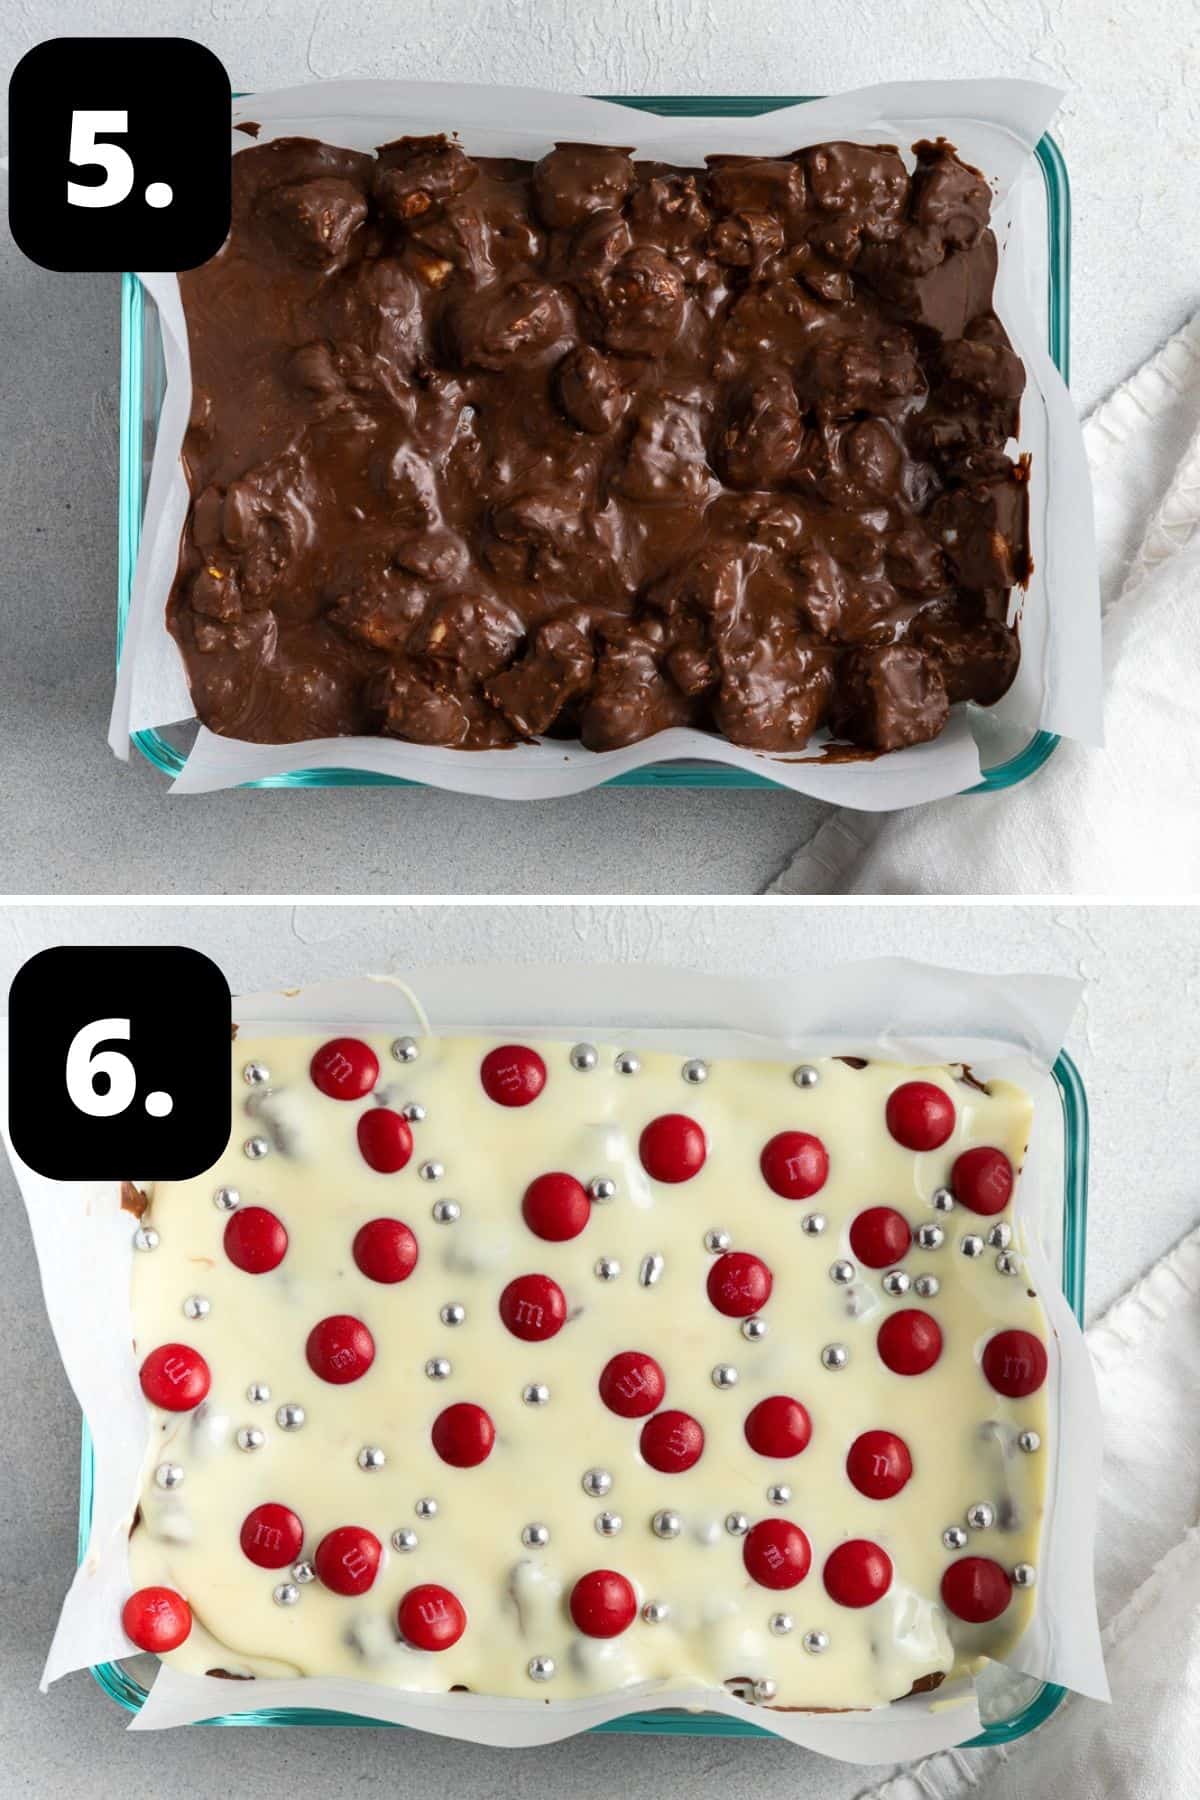
5 – Partially chill the rocky road:
Once the slice is partially chilled, it is ready for decorating.
6 – Add the topping and decorations:
Top the slightly chilled slice with the melted white chocolate and decorate.
Place in the refrigerator for 2 hours or until set and then cut it into 10 pieces.
Hint: the key to making rocky road is to have everything prepared before you melt the chocolate. Otherwise, the chocolate may begin to set, making it lumpy and difficult to combine with the other ingredients.
Tips for Success, Storage and FAQs:
You can store it in an airtight container in the fridge for up to 2 weeks. I like to put a few sheets of kitchen paper in the bottom of the container to help absorb any moisture.
The Christmas Rocky Road can be frozen for up to 3 months. Store in an airtight container, ensuring that some baking paper is kept between the pieces to avoid them sticking together.
Heat a large knife under hot water before slicing. This will help the knife to move more easily through the chocolate. It is easier to cut if you remove it from the fridge 15-30 minutes before you cut it.
Top Tip:
For the best result it is important to use a good quality chocolate.
Moisture is the enemy when melting chocolate as it can cause the chocolate to seize. Care must be taken to ensure that not a drop of water gets into the bowl. To stir the chocolate, I recommend a metal spatula or spoon as wooden spoons can retain moisture.
Serving Suggestions:
Our Christmas Rocky Road is always a part of my festive entertaining. To serve, simply cut into squares and arrange the Rocky Road on a pretty platter. Serve for dessert, morning or afternoon tea.
Other suggestions are:
- Take it to a potluck.
- A gift for a friend or family member. Place some pieces in a cellophane bag and tie it with a pretty ribbon. It makes a lovely edible gift.
- It is an ideal sweet treat or an addition to desserts when you are entertaining.
- Enjoy with other chocolate treats like my Chocolate Tiffin, Hedgehog Slice or Coconut Truffles.
I hope you will love our family favourite treat! This Christmas Rocky Road is the perfect addition to your festive table. Please let me know in the comments below when you have given it a try.
Alex xx
More Delicious Recipes For You To Try:


Stay in touch!
Follow me on Facebook, Pinterest, Flipboard and Instagram and subscribe to my newsletter.

Christmas Rocky Road
Please note:
For accuracy, when weights are provided, we recommend weighing your ingredients. This will produce the best results. All oven temperatures listed are for fan forced.
Ingredients
For the Christmas Rocky Road Base:
- 200 g (7 oz) milk chocolate – cut into even pieces See Note 1
- 100 g (3.5 oz) dark chocolate – cut into even pieces
- 20 g (¼ cup) desiccated coconut
- 80 g (1 cup) white marshmallows – quartered See Note 2
- 45 g (⅓ cup) pistachios – unsalted/shells removed
- 100 g (½ cup) glacé/candied red cherries – halved
For the Topping:
- 100 g (3.5 oz) white chocolate
- 2 tablespoon red m&m's – or other candy
- 1 teaspoon silver cachous
Instructions
- Line an 18 cm x 13 cm (7 inch x 5 inch) slice tin with baking paper.
- Place the desiccated coconut, quartered marshmallows, pistachios and cherries in a bowl.
- Melt the milk and dark chocolate: place the chopped chocolate pieces in a bain-marie/double boiler or heatproof bowl set over a pan of barely simmering water, making sure the bowl doesn’t touch the water. Stir with a metal spoon or spatula until the chocolate has almost melted. Remove from the heat – the residual heat will melt the remaining chocolate.
- Once the chocolate has melted, leave it for a couple of minutes to cool slightly. See Note 3.Once cooled slightly, pour into the bowl with the marshmallows, coconut, pistachios and cherries.
- Stir well so everything is covered in the chocolate.Pour into the prepared tin and flatten down with a spatula or metal spoon. Place in the refrigerator for 30 minutes.
- In a clean bowl, melt your white chocolate. Top the slightly chilled rocky road with the white chocolate and decorate with your toppings.
- Place in the fridge for 2 hours or until set.
- Cut into 10 pieces using a warm sharp knife. It’s easier to cut if you take it out of the fridge 15-30 minutes before you cut it.Store in the fridge in an airtight container for up to 2 weeks.
Notes
- Chocolate: use the best quality chocolate that you can – this will produce the best result. I like to use a combination of chocolate, but if you prefer to use all milk chocolate or all dark chocolate, that is fine.
- Marshmallows: I prefer to use regular marshmallows (I feel they have a better texture to mini), and cut them into quarters. Alternatively, use mini marshmallows if you prefer.
- Melting the chocolate: if you prefer, you can melt the chocolate in the microwave – melt at 20 second intervals, stirring after each one.
- Storage: you can store it in an airtight container in the fridge for up to 2 weeks. I like to put a few sheets of kitchen paper in the bottom of the container to help absorb any moisture.
- Freezing: the Christmas Rocky Road can be frozen for up to 3 months. Store in an airtight container, ensuring that some baking paper is kept between the pieces to avoid them sticking together.
- Nutritional information: please note, the nutritional information is based on the Rocky Road being cut in to 10 pieces. The nutritional information is an estimate only.
Nutrition Estimate:
Nutritional Disclaimer:
The nutritional information is an estimate only, and is derived from online calculators. For accurate results, we recommend calculating the nutritional information based on the ingredients and brands you use.
Rochelle
Love this recipe! I used this for last year Christmas as well and it was a hit at work. The pistachios and glacé cherries give it a nice flavour.
Alexandra Cook
Thank you, Rochelle!
Love to hear this!! Appreciate your comment. Alex xo
Anita Grace MacDonald
Can I freeze it?
Alexandra Cook
Hello Anita,
The Rocky Road can be frozen for up to 3 months. Store in an airtight container, ensuring that some baking paper is kept between the pieces to avoid them sticking together.
Let me know if you give the recipe a try! Alex xo
Linda
Delicious. I added some extra cherries on top instead of the lollies, but otherwise followed the recipe. Will be making for gifts.
Alexandra
Hi Linda, I am so pleased that you enjoyed the Christmas Rocky Road and plan to make some as gifts. Adding extra cherries is a great idea! 🙂
Jean
Love this as an edible gift idea to friends and delicious too!
Alexandra
Hi Jean, it makes a great edible gift, it is always well received. 🙂