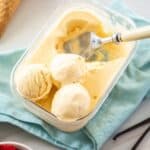
No-Churn Vanilla Ice Cream
You will enjoy the freshness and smooth, creamy texture of my classic No-Churn Vanilla Ice Cream. There is something special about homemade ice cream; it tastes so much better than store bought varieties and it is very easy to make. Made with just four ingredients.
Servings 6 people
Calories 321kcal
Ingredients
- 4 large egg yolks - at room temperature
- 60 g (¼ cup) caster/superfine sugar
- 420 ml (1 + ¾ cups) heavy whipping/thickened cream See Note 1
- 2 teaspoon vanilla bean paste or extract - or to taste See Note 2
Instructions
- Place an airtight container, which will contain the ice cream, into the freezer to chill.I use a container that has a 3-4 cup capacity which makes for easy removal. Alternatively, you could use a loaf pan that is wrapped well in cling film.
- Pour the cream into a heavy based saucepan and place over a medium heat. Bring the cream to just below the boil.
- Prepare a double boiler by having a saucepan with lightly simmering water which will hold a heatproof bowl.
- Meanwhile, combine egg yolks and caster/superfine sugar in the heatproof bowl. Using a whisk or hand-held electric beaters, whisk them together until they are light, fluffy and lemon-coloured.
- Slowly pour the near-boiling cream onto the yolk and sugar mixture, whisking vigorously. Do not pour too quickly, you need to temper the eggs. (See Note 3.)
- When all the cream has been added, place the bowl over the saucepan of barely simmering water on the lowest possible heat.Stir constantly with a wooden spoon in a figure of 8 until the custard begins to thicken. Don’t be tempted to do this over high heat - you may end up with scrambled eggs.
- The custard is ready when it lightly coats the back of a wooden spoon. To test, run your finger along the back of the spoon – if it leaves a clear trace the custard is ready.
- Strain the custard through a fine sieve into a clean bowl and leave to cool on the kitchen bench, stirring occasionally so that a skin doesn’t form.
- When the custard is cool, flavour with vanilla paste or extract to taste. It is important to over-flavour as the ice cream will lose flavour once frozen.Pour the ice cream into the chilled container and place in the freezer.
- Remove from the freezer and stir the mixture with a fork every half hour for about 3 hours until the mixture is mostly set.Once mostly set, leave to freeze completely. (See Note 4.)
- Before serving, remove the ice cream from the fridge for about 10 minutes to allow it to soften slightly.Store the ice cream in the freezer in a freezer-safe, shallow, airtight container. As an extra precaution against the formation of ice crystals, press a piece of plastic wrap onto the surface of the ice cream. The ice cream will have the best flavour and texture for 5-7 days.
Video
Notes
- Cream: use cream that contains approximately 35% milk fat.
- Vanilla: I like to use vanilla bean paste with seeds; it has a pure, sweet vanilla taste and gives the finished product the speckles of vanilla bean seeds. If you prefer, you can use good quality vanilla extract which is naturally produced from the vanilla bean. Avoid those which are synthetically flavoured.
- Tempering the eggs: to temper the eggs, you slowly add the hot liquid to the egg mixture. If you just added the eggs to the hot cream you would end up with cooked eggs. The intention is to slowly raise the temperature of the eggs without scrambling them.
- Freezing time: is approximate. Total freezing time will depend on the size of your container and the temperature of your freezer.
- Storage: store the ice cream in the freezer in a freezer-safe, shallow, airtight container. As an extra precaution against the formation of ice crystals, press a piece of plastic wrap onto the surface of the ice cream. The ice cream will have the best flavour and texture for 5-7 days.
Nutrition
Calories: 321kcal | Carbohydrates: 13g | Protein: 4g | Fat: 28g | Saturated Fat: 17g | Polyunsaturated Fat: 2g | Monounsaturated Fat: 8g | Cholesterol: 202mg | Sodium: 25mg | Potassium: 79mg | Sugar: 13g | Calcium: 61mg | Iron: 0.4mg
