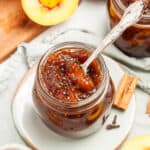
Fresh Peach Chutney
My homemade Fresh Peach Chutney is a versatile, gently spiced condiment that goes perfectly with many foods. When peaches are in season, I like to use them in as many ways as possible. So, if you find yourself with an abundance of fresh peaches, this is a great way to preserve some.
Servings 5 250 ml jars
Calories 901kcal
Ingredients
- 1 ½ kg (3.3 lb) peaches See Note 1
- 3 ¾ cups (750 gm) brown sugar
- 1 cinnamon stick
- 1 teaspoon yellow mustard seeds
- 2 teaspoon ground ginger
- 8 whole cloves See Note 2
- ½ cup (90 gm) sultanas/golden raisins
- 2 teaspoon sea salt
- 2 long red chillies - seeds removed and finely chopped See Note 3
- 3 cups (750 ml) apple cider vinegar
- 2 Granny Smith apples - unpeeled and grated
- 3 medium red onions - finely chopped
Instructions
To sterilise the Jars:
- Preheat the oven to 130 Degrees C (270F).Use glass jars, either new or recycled, with an airtight, metal lid. If recycling jars, ensure that the jars do not have cracks or chips and the lids are in good condition. Discard any lids that are pitted or rusted. Wash the jars and lids. If washing by hand, use hot, soapy water and then rinse them well. Alternatively, wash them in the dishwasher. Place jars and lids on a baking tray. Heat in the oven for at least 20 minutes. See Note 4.
To make the Chutney:
- To peel the peaches, half fill a medium sized saucepan with water and bring it to the boil.Meanwhile, prepare a medium sized bowl of iced water.
- Make a cross incision on the base of the peaches and place them in the boiling water for approximately 20 seconds.
- Remove the peaches with a slotted spoon and place in the iced water bath to stop the cooking process.Remove the peach from the iced water when it is cool enough to handle. Use a small, sharp knife to peel the skin. It will easily peel off.
- Cut the peach in half, cutting around the pit using the natural indentation of the peach as a guide. Gently twist the halves in opposite directions to separate them.Carefully remove the pit with a sharp, pointed knife and discard the pit. Remove any bruises.
- Cut the peaches into large chunks. (About 2.5cm or 1 inch)
- Place all the ingredients into a large, non-reactive saucepan or stockpot. See Note 5.Stir over medium-high heat until the sugar dissolves.
- Bring the chutney to boiling point then allow it to simmer for approximately 60 minutes.Stir occasionally until the mixture has reduced in volume, the surplus liquid has evaporated and the mixture thickens. The simmering time may vary as it will depend on the size of the pan and the amount of heat applied. As it thickens, you will need to be diligent with stirring and watch that it does not catch on the bottom of the pan. You can check that the chutney is ready by sliding a wooden spoon across the surface of the mixture. It is ready when the chutney does not immediately fill the gap. If the chutney is still too runny, cook it a further 5 minutes and test again.
- Be aware that as the liquid reduces, the mixture may bubble and spit and you need to take great care. I suggest that to be on the safe side, you wear a garment with long sleeves to protect yourself and use a long handled wooden spoon.
- After one hour, or your chutney has thickened as per above, remove the saucepan from the heat and stand for 10 minutes to allow the fruit to settle. Remove and discard the cinnamon stick.
- Remove your sterilised jars from the oven, and whilst they are still hot, fill with the chutney and seal the jars immediately.
- When the jars are cool enough to handle, remove any spills on the outside of the jars and label and date the chutney. Store it in a cool, dark, dry location. The chutney will keep for about one year. (See Note 6.)Set it aside for a minimum of one week, ideally two-four weeks. This will allow the flavours of the chutney to amalgamate and the vinegar to mellow.When removing chutney, always use a clean, dry spoon to avoid spoilage. Being extra cautious, I always store a jar in the fridge once it is opened.
Notes
- This is the weight of the peaches before the stones have been removed. I have used yellow peaches, but you could also use white peaches or nectarines. If possible, choose freestone peaches over the clingstone varieties. As the names imply, the stones in freestone are easily removed but with clingstone, there is a little waste as you will need to cut around the stone.
- You could use ½ teaspoon of ground cloves.
- The long red chillies are also known as cayenne chillies. If you don’t have chillies, you could add dried chilli flakes or cayenne pepper to your taste.
- Properly sterilising your jars is an essential process to remove bacteria that could cause your preserves to spoil. Wash the jars and lids either in the dishwasher or by hand in hot soapy water, and rinse well. Do not dry them with a tea towel. Place jars and lids on a baking tray. If you are using Kilner jars with rubber seals, be sure to remove the seals before placing the jars in the oven. The dry heat of the oven would damage the seals. Boil the seals separately in a saucepan for about 10 minutes. Heat the jars in the oven for at least 20 minutes. When your preserves are ready to bottle, use thick oven mitts or jar tongs to remove the jars. Do not place them on a cold surface as they may shatter. I place mine on a wooden chopping board which I cover with a tea towel. Always sterilise a few more jars than you think you will need. It is better to have too many jars than not enough.
- Non-reactive saucepans are stainless steel, glass or enamel. Aluminium, copper and iron pans are reactive. Acidic ingredients, such as vinegar, may cause the chutney to discolour and take on a metallic taste if cooked in reactive pans.
- A preserve made with vinegar needs time to mature. Set it aside for a minimum of one week, ideally two-four weeks. This will allow the flavours of the chutney to amalgamate and the vinegar to mellow.
- Please note, the nutritional information is based on one whole jar. The nutritional information is an estimate only.
Nutrition
Calories: 901kcal | Carbohydrates: 223g | Protein: 5g | Fat: 2g | Saturated Fat: 1g | Polyunsaturated Fat: 1g | Monounsaturated Fat: 1g | Trans Fat: 1g | Sodium: 995mg | Potassium: 1268mg | Fiber: 9g | Sugar: 206g | Calcium: 215mg | Iron: 3mg