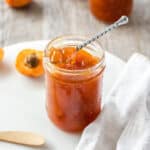
Apricot Jam
You will love this classic recipe for Apricot Jam, made with sweet, ripe, juicy apricots at the height of their season. It is the ultimate way to preserve this delicious stone fruit to enjoy throughout the coming months. All you need are three ingredients to make this delicious jam: just fresh apricots, sugar and lemon juice - no pectin is required.
Servings 12 250ml (8.5 oz) Jars
Calories 682kcal
Equipment
- 12 x 250ml (8.5 oz) Jars
Ingredients
- 2.5 kg (5.5 lb) fresh apricots - prepared weight See Notes 1 and 2
- ¼ cup (60 ml) water
- ¼ cup (60 ml) freshly squeezed lemon juice See Note 3
- 1.8 kg (4 lb) granulated sugar See Note 4
Instructions
To Sterilise the Jars:
- Preheat the oven to 130 Degrees C (270F). Use glass jars, either new or recycled, with an airtight, metal lid. If recycling jars, ensure that the jars do not have cracks or chips and the lids are in good condition. Discard any lids that are pitted or rusted. Wash the jars and lids. If washing by hand, use hot, soapy water and then rinse them well. Alternatively, wash them in the dishwasher. (See Note 5.)Place jars and lids on a baking tray. Heat in the oven for at least 20 minutes. If your lids contain rubber seals, allow these to air dry instead of placing in the oven.Do not place the hot jars on a cold surface as they may shatter. I place mine on a wooden chopping board which I cover with a tea towel. Always sterilise a few more jars than you think you will need. It is better to have too many jars than not enough.
To Make the Apricot Jam:
- Put 2 small heatproof plates or saucers in the freezer to chill. (See Note 6.)
- Wash the apricots and pat dry. Remove any minor blemishes then cut them in half and remove the stones.
- Place the apricots in a large, wide saucepan and add the lemon juice and water. (See Note 7.)
- Bring to a simmer over medium heat, stirring occasionally with a long-handled wooden spoon. (See Note 8.)
- Cover the pot and cook, stirring frequently, until the apricots are tender and cooked through - this will take about 10-15 minutes. At this stage, if you prefer less chunky jam, you could blend it using a hand-held stick blender. Take the saucepan off the heat to do this.
- Add the sugar to the apricots and stir constantly, without boiling, until the sugar has dissolved.
- After dissolving the sugar, increase the heat and bring the fruit to a boil to cook the liquid off. Continue to cook, uncovered, stirring occasionally to make sure the mixture does not catch and burn on the bottom of the pan.As the mixture reduces, stir frequently. At this stage, the jam requires your attention so do not venture too far away from the stove. Remove any scum that forms with a spoon.
- When the jam looks thicker, after boiling for about 20 minutes, (See Note 9), turn off the heat and put a small amount of jam on a chilled plate. Let it stand for a minute to cool then push your finger through the jam. If it wrinkles, even slightly, it is ready. If it is still quite liquid put it back on the heat for a further 5 minutes and check again.
- You can also use a thermometer to check for setting point. To use this method, you will need a sugar thermometer. Clip the thermometer to the side of your pan. When the thermometer reads 104 C (220 F) the jam is ready.
- When the jam reaches setting point, remove the pan from the heat. If there is any scum on the surface of the jam, remove with a spoon or add a teaspoon of butter and stir well. It will dissolve the scum.
- Let the jam stand for about 10 minutes to allow the fruit to settle. This will ensure that any pieces of fruit will be evenly distributed throughout the jam. Without standing, the fruit will rise to the top of the jar.
- Stir the jam and carefully ladle it into the heated, sterilised jars. You need to be very careful. A splash or spill from hot jam would result in a serious burn. I recommend that you wear clothing with long sleeves. Additionally, this is not the occasion to have children nearby. Ensure the jars are filled to the brim. Immediately seal the jars tightly with sterilised lids, being careful not to burn your hands.
- The jam will still be liquid when you ladle it into your jars. It can take up to 48 hours to completely set. You don't want to cook it until it is thick.
- When cool, remove any spills from the jars and label with the date and name. Store the jam in a cool, dark place. It will be shelf-stable for a year.When using the jam, always use a clean, dry spoon to avoid contamination. After opening a jar, as a further precaution, store it in the refrigerator.
Video
Notes
- Apricots: the weight listed is the prepared weight – ie: after the stones and any blemishes have been removed. Ensure your fruit is freshly picked and of good quality. Avoid fruit that is bruised or over-ripe. The apricots contain pectin, which aids in the jam setting. If your fruit is older, it will contain less pectin. You can make jam with just a small quantity of fruit. If you use a smaller quantity of fruit the jam will set in a shorter cooking time.
- Quality of fruit: it is essential to use just ripe, or some slightly unripe, fruit. Choose fruit with great flavour. Bruised or over-ripe fruit is not suitable.
- Lemon juice: not only balances the sweetness of the sugar, but it also helps the pectin to set the jam. We prefer to use freshly squeezed lemon juice.
- Sugar: do not reduce the amount of sugar. The sugar not only sweetens the fruit, but it helps the jam to set and acts as a preservative. If you reduce the sugar, your jam may not be shelf-stable and may go mouldy.
- Sterilising the jars: this is an essential process to remove bacteria that could cause your preserves to spoil.
- Chilled plates: the chilled plates are used to quickly cool the jam when testing the setting point.
- Saucepan: always choose your widest saucepan that has enough height to enable the jam to boil vigorously. The fruit should not come more than halfway up the sides of the saucepan. More surface area means the liquid can evaporate faster and having sufficient height means you can boil the jam at a higher heat. Avoid aluminium, copper or iron pans; the acid in the fruit may react with the pan, giving the jam a metallic taste.
- Wooden spoon: to stir, use a long-handled wooden spoon. Metal will become dangerously hot. A long-handled spoon helps to keep your hand away from the boiling jam.
- Setting point: the amount of time to reach setting point will vary depending on the amount of fruit, the size of your saucepan and the heat that you apply. Be vigilant in checking your jam - if boiled too long the pectin may be destroyed and the jam may not set.
- Storage: when the recipe is made according to instructions and the jars have been sterilised properly, the jam will be shelf-stable for up to a year when stored in a cool, dark place. A jar should be refrigerated after opening. If you prefer to can the jam, please refer to the USDA Canning Guidelines for techniques.
- Nutritional information: is based on one whole jar. The nutritional information is an estimate only.
Nutrition
Calories: 682kcal | Carbohydrates: 173g | Protein: 3g | Fat: 1g | Saturated Fat: 1g | Polyunsaturated Fat: 1g | Monounsaturated Fat: 1g | Sodium: 4mg | Potassium: 548mg | Fiber: 4g | Sugar: 169g | Calcium: 29mg | Iron: 1mg
