Blood Orange Curd
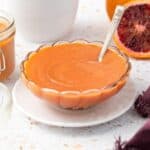
My Blood Orange Curd is smooth, full of vibrant flavour and so easy to make. We use egg yolks to help set the curd, along with butter which also provides a lush, creamy silkiness. With a short season of availability, their glorious colour and their unique, almost raspberry-like flavour, this is a great way to make the most of beautiful blood oranges.
Servings 2 cups
Calories 1075kcal
Ingredients
- 8 egg yolks See Note 1 and 2
- 1 cup (220 g) superfine/caster sugar See Note 2
- ½ cup (125 g) unsalted butter
- 4 teaspoon finely grated blood orange zest - loosely packed See Notes 3 and 4
- 200 ml (¾ cup + 1 tbsp) strained blood orange juice
Instructions
- Add the egg yolks and sugar to a medium-size bowl - See Note 2.
- Whisk the egg yolks and sugar together until well combined.
- Tip the whisked yolks and sugar into a heavy-based, non-reactive saucepan – (See Note 5.) Add the butter, zest and juice to the pan.
- Place the saucepan over low-medium heat and, using a whisk, stir constantly until the mixture just comes to a simmering point. As soon as the bubbles appear, remove the saucepan from the heat. (See Note 6).Stir for a minute or so - this will prevent a skin forming as the curd cools. The curd will thicken as it cools.
- Transfer to sterilised jars (See Note 7) while the curd is still slightly warm. When the curd is cold, add the lids and seal well.The Blood Orange Curd will keep for 1 week if well sealed and refrigerated.
Notes
- Separating eggs: when separating the eggs it is important to remove as much of the white as possible so that it does not leave white specks in the curd.
- Adding the sugar: do not add sugar to yolks and leave to stand. The sugar changes the chemical structure of the eggs and “cooks” the yolk. So, once you add sugar to the yolks, be sure to mix right away for a smooth and creamy result.
- Blood oranges: the number of blood oranges you use may vary, depending on how much juice they contain. I used four large, very juicy oranges.
- Zest: the zest should be extremely fine, unable to be detected. For this, you will need a very sharp, fine grater and ensure that you only grate the surface of the orange and not go deeper to the white pith.
- Non-reactive saucepans: are those which are ceramic, stainless steel, glass or enamelled cookware. Copper, iron and aluminium pans are reactive. Acidic foods, such as lemons, may take on a metallic taste and discolour if cooked in such pans.
- Whisk: I prefer to use a whisk. Using a whisk makes it easier to get into the edges of the pan. Whisk almost constantly. This will ensure that the curd is creamy and smooth.
- Jars: choose small glass jars with an airtight lid. Wash the jars and lids either in the dishwasher or with hot soapy water and rinse well. Place the jars into an oven which has been preheated to 130 Degrees C (270 F). Place the jars into the oven for at least 20 minutes. Remove the jars and leave to cool a little before adding the curd. The jars and curd should both be slightly warm.
Nutrition
Calories: 1075kcal | Carbohydrates: 114g | Protein: 13g | Fat: 66g | Saturated Fat: 36g | Polyunsaturated Fat: 5g | Monounsaturated Fat: 20g | Trans Fat: 2g | Cholesterol: 900mg | Sodium: 43mg | Potassium: 312mg | Fiber: 1g | Sugar: 109g | Calcium: 125mg | Iron: 2mg