


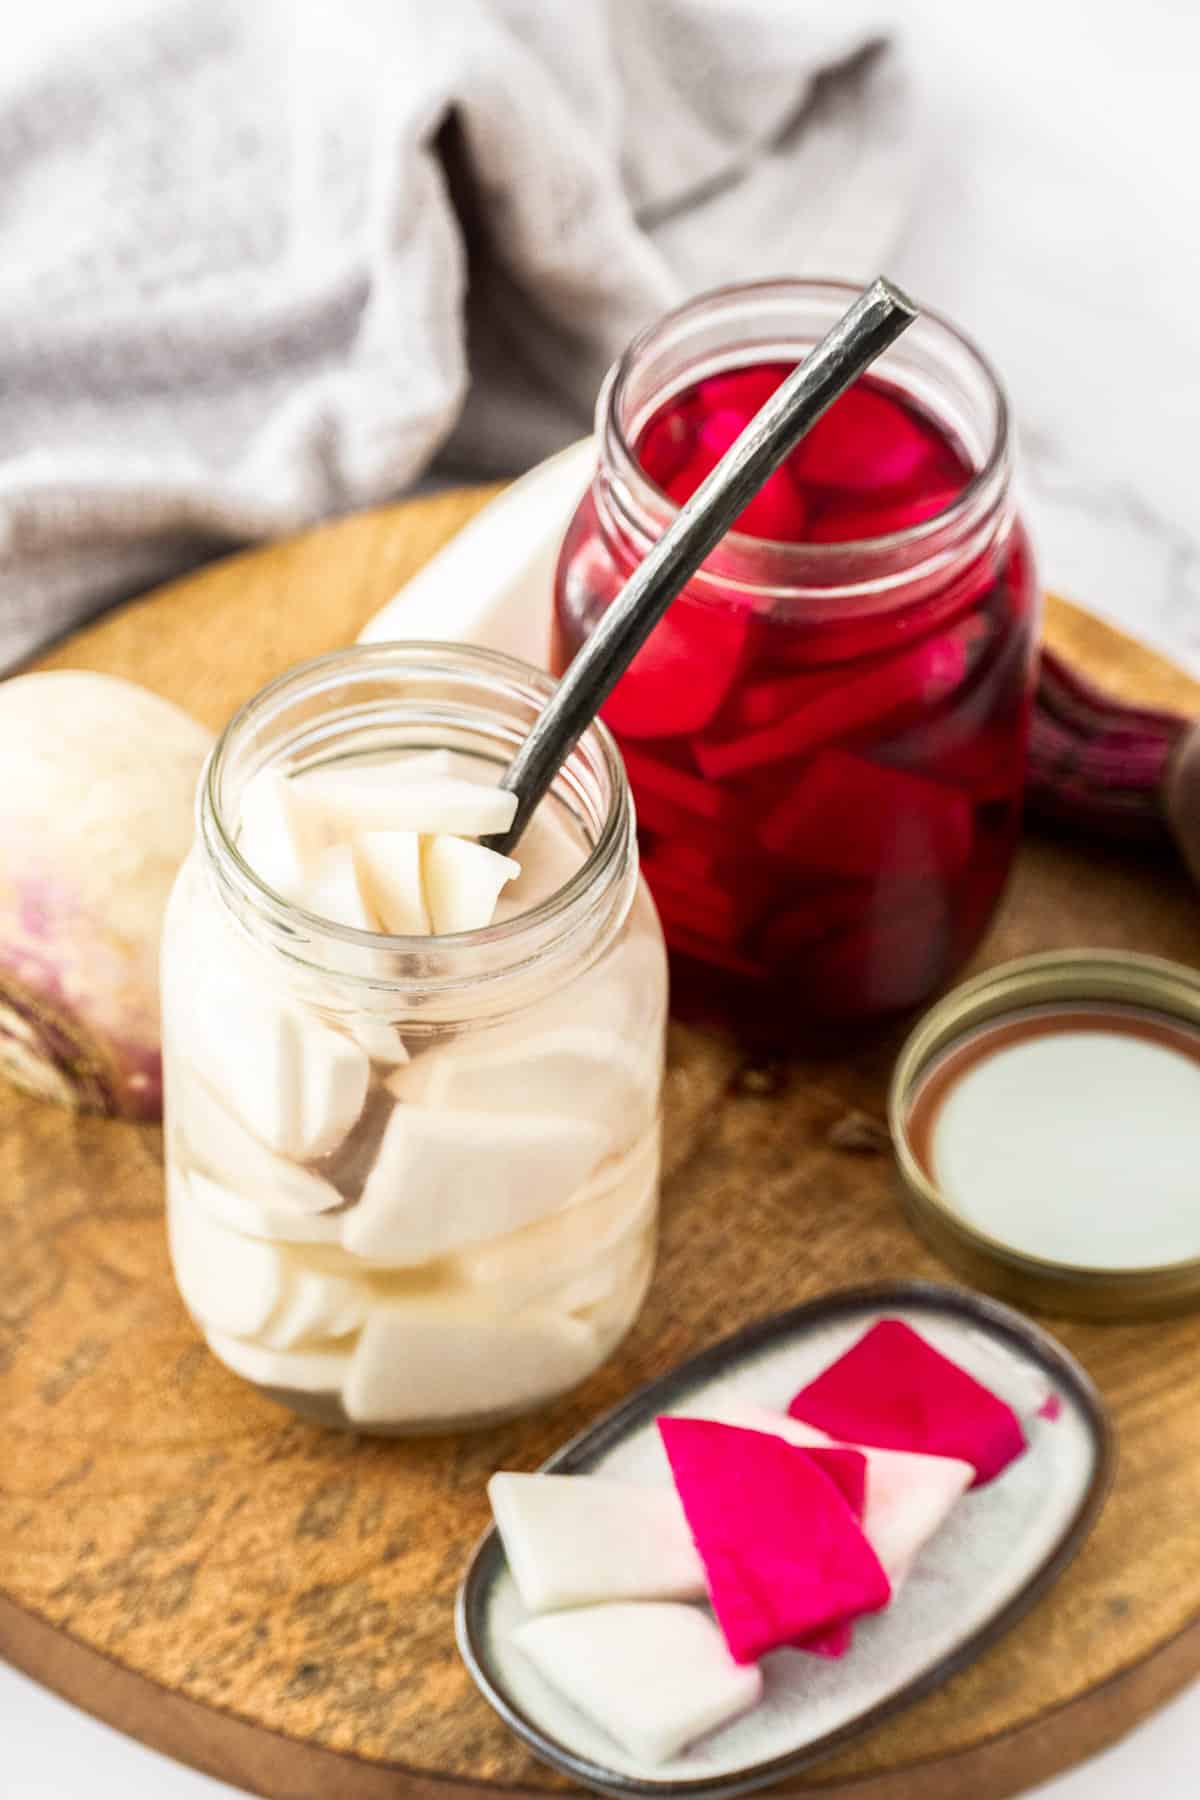
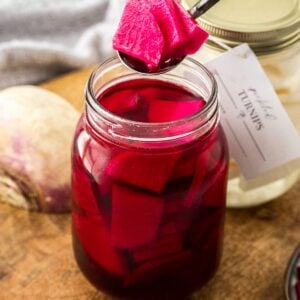
These Pickled Turnips are so delicious. The easy, quick pickling method transforms the humble turnip into a crunchy, tangy, slightly salty condiment that is delicious with so many things! They have the typical vinegary tang of pickles along with a gentle, naturally occurring heat from the turnip. If you taste a raw turnip, you will notice that it does have a spicy bite. By adding some sliced beetroot to the jar of sliced turnips, the beetroot gradually transfers its pink hue to the turnips.

Why you’ll love this recipe:
Pickles are a staple food throughout the Middle East. In fact, they will be on the table at all meals, from breakfast through to dinner, and Pickled Turnips are likely to be part of the selection. A classic method is to pickle them in a vinegar brine, along with beetroot, which transforms them to a vibrant shade of pink.
It is said that we eat with our eyes first, and the colour of the turnips makes them immediately appealing and appetising. The gorgeous pink of the Pickled Turnips is a great way to add colour, as well as flavour and texture, to the food on your table. And the best part is, there are no artificial additives, the colour is naturally derived.
You will love this recipe for Pickled Turnips because:
- They are quickly and easily made from ingredients that are readily available.
- Pickling is such a simple process. It is a great way to preserve foods to enjoy in the future.
- Like their relatives in the brassica family, such as kale, cauliflower, and broccoli, they are nutritional powerhouses making them a great addition to your diet.
- They are the perfect condiment to serve with Middle Eastern food such as my Baba Ganoush and Easy Hummus.
- Also, the Pickled Turnips are great companions to falafel, my Roast Chicken or with meats, as their tangy flavour cuts through the richness of some dishes.
Ingredients in this recipe:
Please see the recipe card further along in the post for exact quantities of ingredients and the full method.
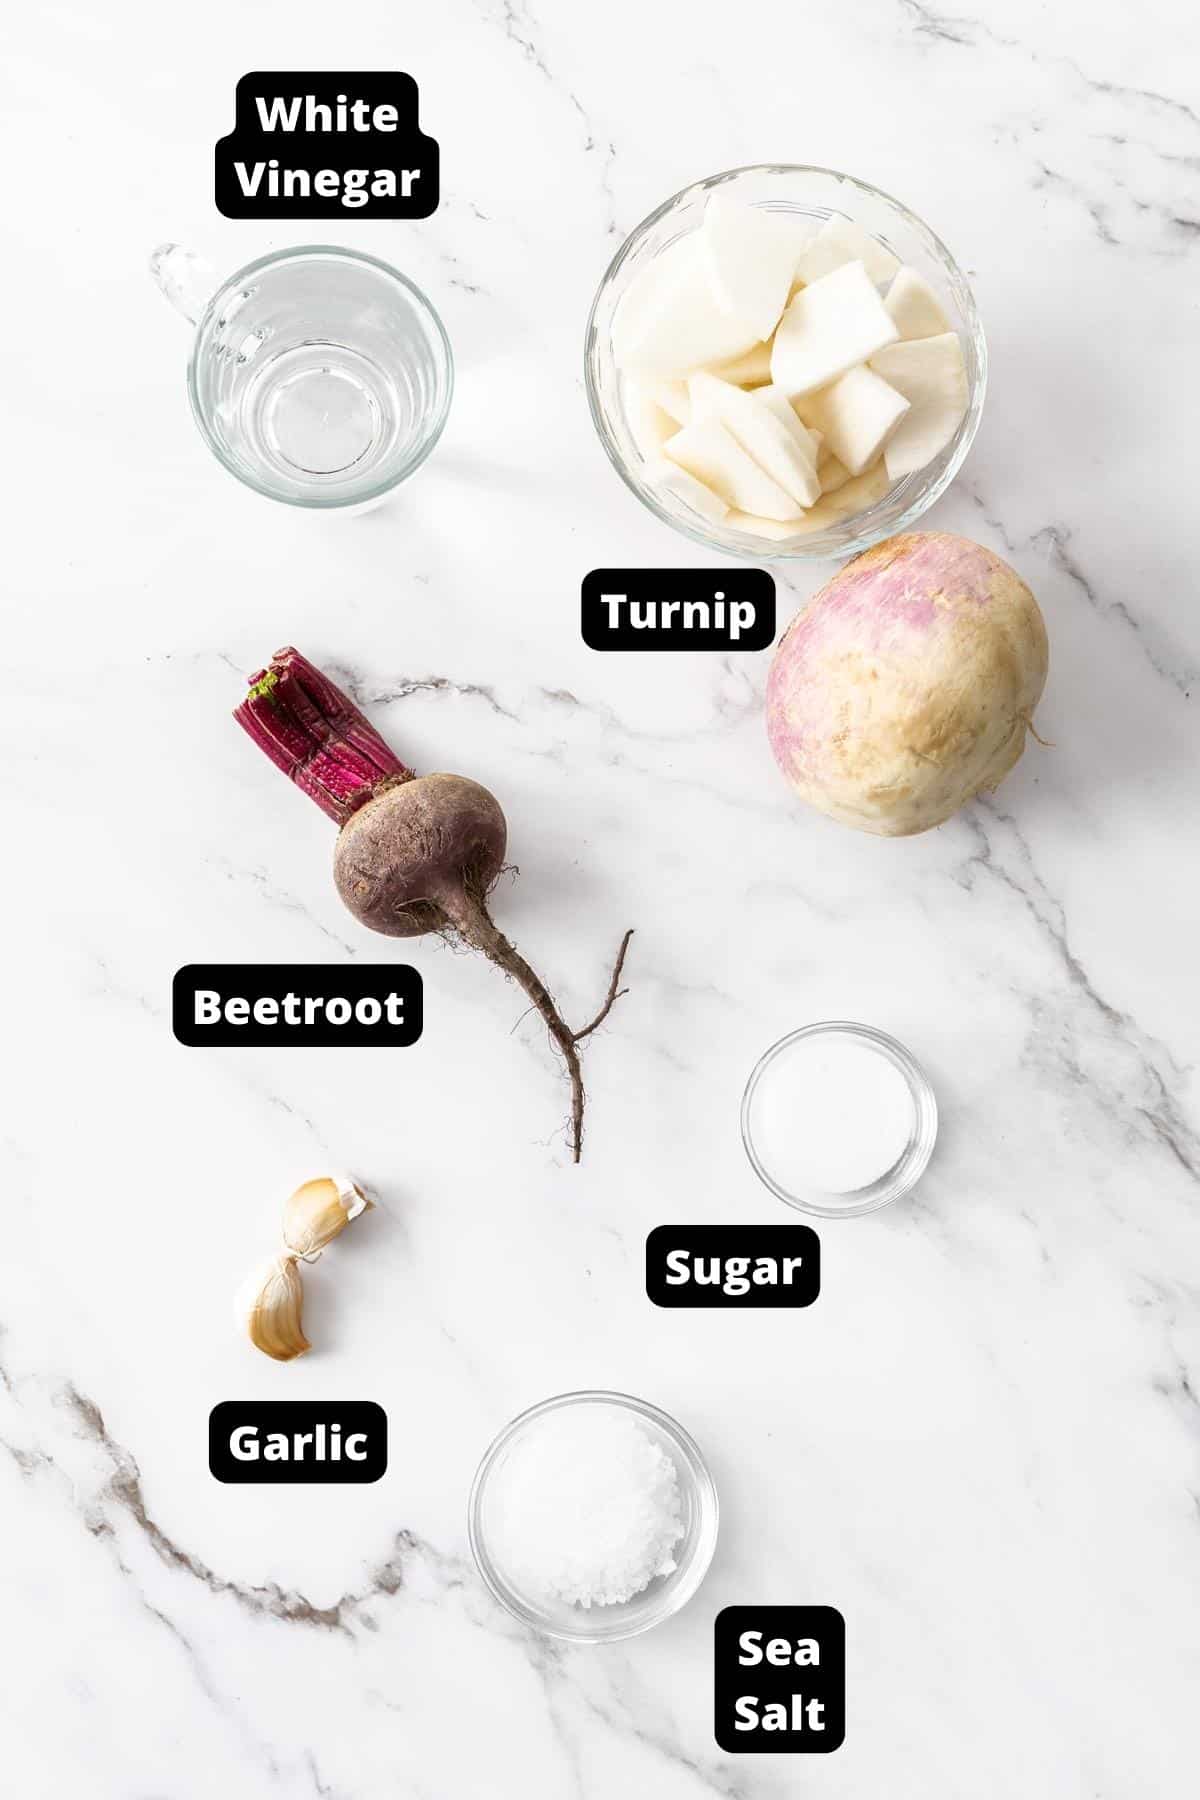
Turnips – I prefer to buy younger, smaller turnips as they have a sweeter flavour. The older, large turnips will be stronger and spicier with a texture that may be spongy or woody.
Beetroot – adding slices of beetroot turns the turnip pink, but you can omit this step if you prefer.
Garlic – a couple of fresh cloves add a lovely flavour to the pickling liquid.
Water – for this pickle, we use water to mellow the brine. For the best flavour, the water should be filtered/un-chlorinated.
Vinegar – for pickling, we use white vinegar with an acidity of 5%, but you can use white wine vinegar or apple cider vinegar if you prefer.
Salt – use coarse cooking salt such as kosher salt or sea salt. Avoid table salt as it may contain an anti-caking agent which could make the brine cloudy. It has finer grains and will make the pickles too salty, and may leave an unpleasant, bitter aftertaste.
Sugar – a small amount of sugar helps to balance the flavours.
How To Make Pickled Turnips:
Please see the recipe card further along in the post for exact quantities of ingredients and the full method.
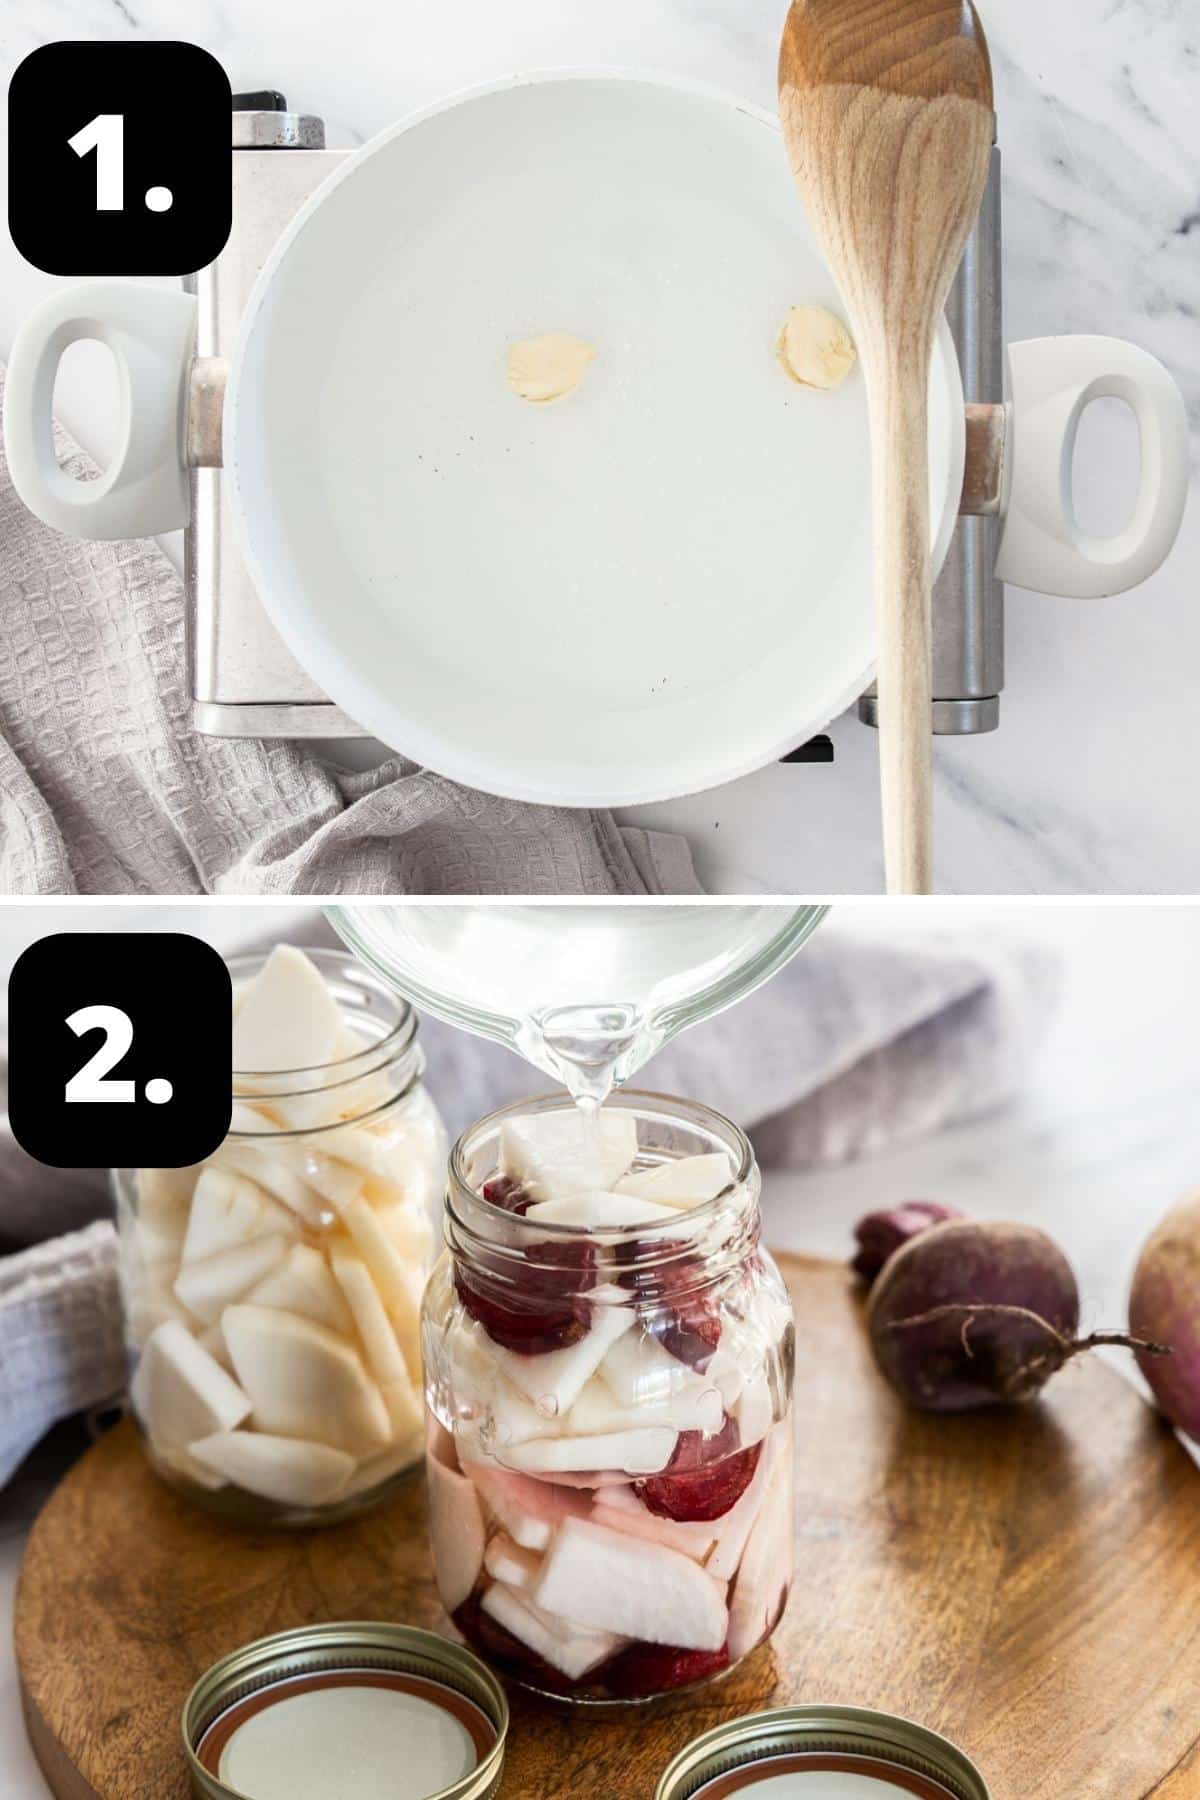
1 – Prepare the pickling brine:
Add the ingredients for the pickle brine to a small, non-reactive saucepan. Stir over medium heat to dissolve sugar, then bring to the boil.
2 – Prepare your turnips and beetroot:
Peel your turnips and beetroot, and trim the top and base.
Cut the turnips in half, and then slice each half into half-moon shapes, about ½ cm (⅕ inch). And, to make the turnip easier to fit in a jar, cut each half-moon into half again.
Add the turnips to both jars. If you wish, you can just add the beetroot to one jar and leave the other Pickled Turnips white.
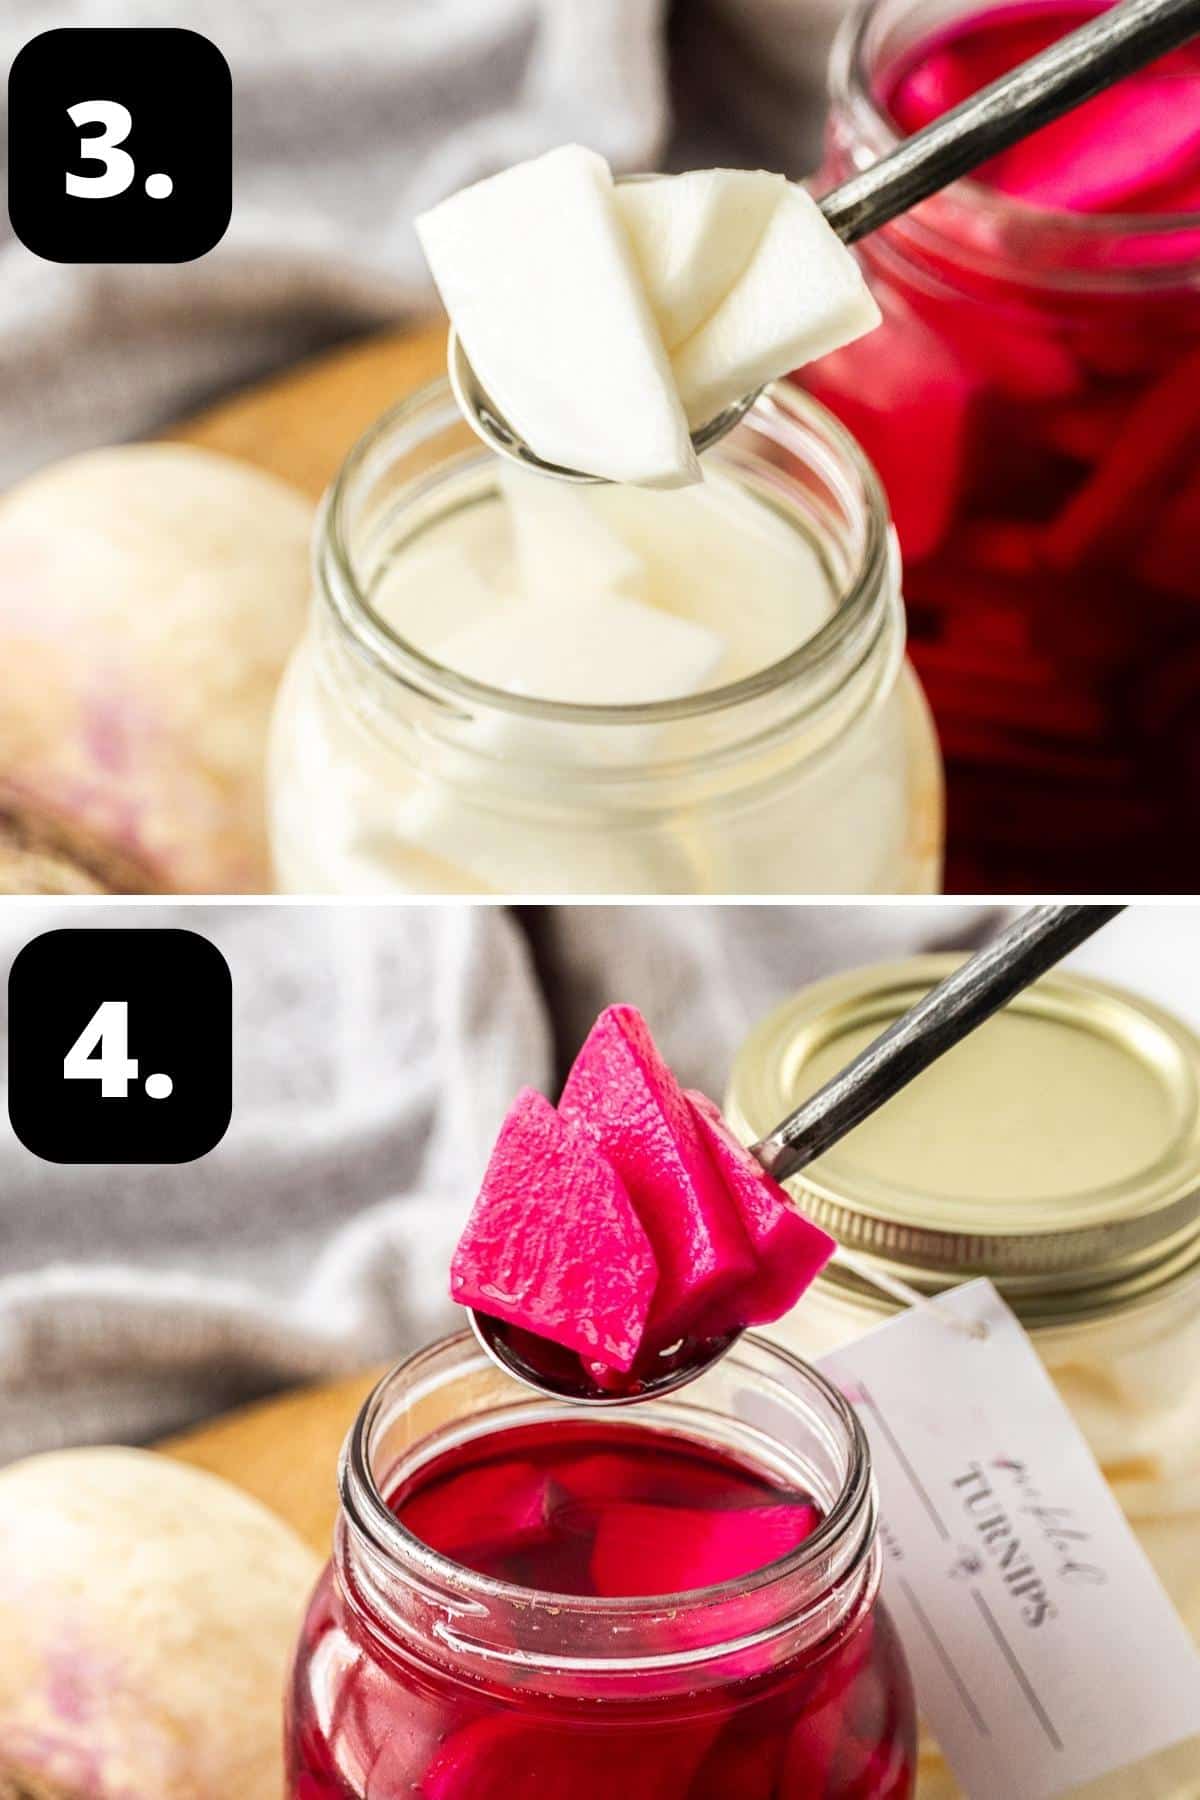
3 – Pickled Turnips:
Divide the pickling liquid between the two jars and then seal them.
Cool on the bench before refrigerating.
4 – Pickled Turnips with Beetroot:
The pink pickles should ideally stand for a minimum of 48 hours to allow the flavour to mellow and the colour to develop properly.
Tips for success and FAQs:
For the best result, choose young, fresh turnips, which will be sweeter and more crunchy than older ones.
It is essential that you sterilise your jars before adding the turnips and brine. This is very simple to do, and I have given full details in the recipe. Also, I recommend that you use a jar with a wide opening to make it easier to add the pickles.
The pickles will keep for several weeks in the refrigerator. They are best eaten within four weeks as the flavours begin to fade over time.
This is a matter of personal preference. I chose to cut my turnips into half-moons and then in half again. However, you could cut them into wedges, discs, or batons.
Store the pickles in the refrigerator and serve them chilled. They taste best when cool.
No, you can omit this if you prefer, and your pickled turnips will remain white. However, apart from adding colour, the beetroot does add slight sweetness.
Variations and substitutions:
It is easy to vary the flavour of your pickling brine. Some suggestions are:
Vinegar – we use white vinegar with an acidity of 5%, but you can use white wine vinegar or apple cider vinegar if you prefer.
Spices – dried chilli flakes or whole black peppercorns – adds an extra spicy flavour.
Herbs – a bay leaf is a good option.
How to select turnips:
Look for small turnips that feel firm and are heavy for their size; they are sweeter with a crisper texture. Older, large ones have a stronger, peppery bite and they may be spongy or woody. The colour should be fresh and they should be free of blemishes.
If they have their leaves attached, look for bright green, perky leaves. Don’t discard the leaves; they are a bonus; cook them like spinach or Swiss chard.
Store the turnip bulbs in the refrigerator for up to two weeks. If you keep the leaves, store them separately, for up to three days.
The turnip is a cruciferous vegetable, a member of the brassica family, along with mustard greens, radishes, daikon, bok choy, cabbage and many others. They are bulbous root vegetables with the most common variety being a creamy white colour with a purple top.
If you’re unsure how to cook them, use them any way that you would use a potato. They lend themselves to being baked, boiled, steamed or mashed. Add them to stews or use them in soups. Finely shred them and add them to coleslaw.
Serving suggestions:
These pink Pickled Turnips are very versatile. Some serving suggestions are:
- Serve them as part of a mezze alongside Baba Ganoush, Hummus, Easy Spelt Focaccia, Oven-Baked Meatballs and Roasted Olives.
- They are ideal served with Roast Butterflied Chicken or a full-flavoured meat dish, such as slow-roasted lamb, as their tangy acidity helps cut through the richness.
- Add them to salads; they provide terrific crunch and colour. Also, they are a great accompaniment to hamburgers and sandwiches.
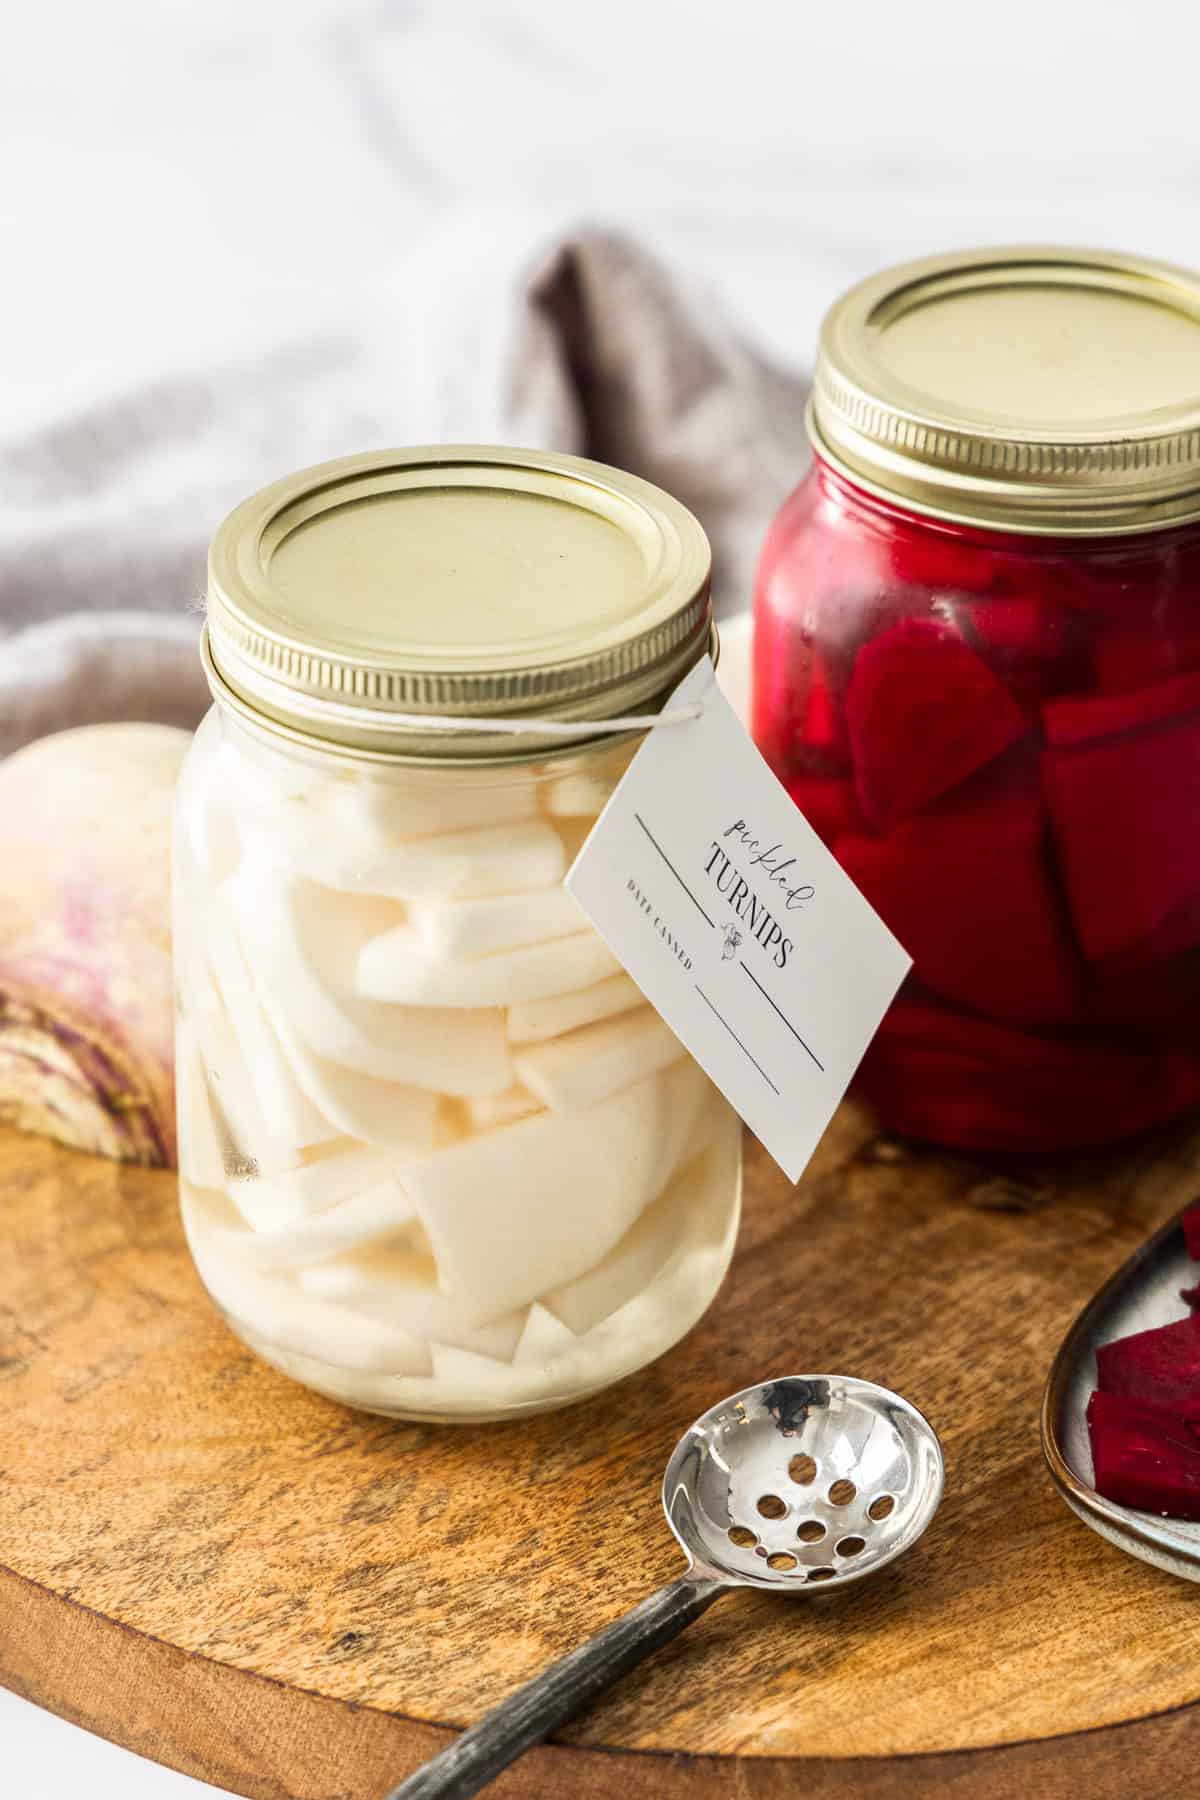
- Give a jar as a gift. You can even print out your own label, as seen in the photos! Simply right-click and save the image below to print out.

If you love pickles, I encourage you to try these Pickled Turnips. They’re easy, and inexpensive to make, so you can whip up a batch in no time. This beautiful, naturally coloured, pink pickle will be a great addition to your table.
Let me know in the comments below when you give them a try!
Alex xx
More delicious recipes for you to try:

Stay in touch!
Follow me on Facebook, Pinterest and Instagram and subscribe to my newsletter.
Pickled Turnips
Equipment
- 2 500ml (17 fluid oz) Jars
Recipe Measurements:
For accuracy, when weights are provided, we recommend weighing your ingredients. This will produce the best results.
Ingredients
- 400 g (14 oz) turnips – prepared weight, approx 2 large turnips See Note 1
- 1 small beetroot See Note 2
- 2 cloves garlic – peeled and smashed sightly See Note 3
- 1 cup (250 ml) water See Note 4
- 1 cup (250 ml) white vinegar See Note 5
- 5 teaspoon sea salt See Note 6
- 2 teaspoon sugar
Instructions
To Sterilise your Jars:
- Sterilise the jar or jars you'll be using to store the pickles. Choose glass jars with an airtight, metal lid and ensure they have been washed by hand in hot soapy water then rinsed well. Check that the metal lids do not have rubber inserts – if they do, allow them to air dry, instead of placing in the oven.Preheat the oven to 130 Degrees C (270 F) and place the jars in the oven for 15-20 minutes. Keep the jars warm.
For the Pickled Turnips:
- Peel your turnips and beetroot, and trim the top and base.
- Cut the turnips and beetroot in half and slice into half-moons, about 0.5 cm thick. Cut the half-moons in half again.
- Add the ingredients for the pickle brine to a small non-reactive saucepan. Stir over medium heat to dissolve sugar, then bring to the boil. Remove from the heat. (See Note 7)
- To your sterilised jars, add the turnips. Add the beetroot to both or just the one jar if you'd like a colour contrast for the pickles.
- Divide the pickling liquid between the two jars and then seal the jars. Allow the jars to cool on your kitchen bench before refrigerating.
- Although you can eat once cool, the pickles are best if you let them sit for 24-48 hours before consuming so the flavours and colour can develop.
Notes
- Turnips: my preference is for younger, smaller turnips as they have a sweeter flavour. The older, large turnips will be stronger and spicier with a texture that may be spongy or woody.
- Beetroot: depending on the size of the beetroot, you may only need to use half.
- Garlic: the garlic cloves add flavour to the pickling brine – you need to use fresh garlic cloves, and not garlic powder or jarred.
- Water: ensure you use filtered water, as water that contains chlorine can alter the taste of the pickles.
- Vinegar: I have used white vinegar that is 5% in acidity. You can also use apple cider or white wine vinegar – just ensure the acidity level is 5%.
- Coarse sea salt: ensure you use cooking salt or coarse sea salt. Regular table salt may contain anti-caking agents and is much stronger.
- Non-reactive saucepans: are those which are ceramic, stainless steel, glass or enamelled cookware. Copper, iron and aluminium pans are reactive. Acidic foods, such as vinegar or lemons, may take on a metallic taste and discolour if cooked in such pans.
- Storage: once the jars have cooled, store the pickles in the fridge for up to four weeks. This is a quick pickle recipe not designed for long term canning.
- Nutritional information: is based on one entire jar, and includes the pickling liquid.
Nutrition Estimate:
Nutritional Disclaimer:
The nutritional information is an estimate only, and is derived from online calculators. For accurate results, we recommend calculating the nutritional information based on the ingredients and brands you use.
This post was originally published as Beetroot Pickled Turnips in June 2020. It has been updated with new photos and more information. The recipe remains the same.
Miranda C.
Easy and delicious and perfect on a platter.
Alexandra Cook
Hi Miranda,
I am so glad you enjoyed this recipe 🙂 Thanks so much for letting me know! Alex xo
Stephanie
I never know how to serve turnips so I was pleased to come across this recipe. Delicious and so nice to have the extra color on the dinner table. Definitely need to make this again soon!
Alexandra Cook
Hi Stephanie,
Thank you for your lovely comments on our recipe for Beetroot Pickled Turnips. It really is a great way to use turnips and the Beetroot adds fantastic colour. 🙂
Nora
What a great recipe! Love how versatile in this way the turnips can be further processed as a condiment!
Alexandra Cook
Hi Nora,
Thank you for your lovely comments on the Beetroot Pickled Turnips. I am delighted to hear that you enjoy them. 🙂
Mary
Two of my favorite thing, beets and turnips. These came out so crunchy and tangy. I loved them ice cold from the fridge. Thanks!
Alexandra Cook
Hi Mary,
I am delighted that you enjoy the Beetroot Pickled Turnips. Thank you for taking the time to let me know. 🙂
Mirlene
If you love beets, you have GOT to try this recipe. So addictive and is bursting with flavor.
Alexandra
Hi Mirlene, thank you for your great comments on the Beetroot Pickled Turnips. The beets really are a great addition to the pickle. :-=)
Melanie
I’ve seen several recipes for pickled turnips but I found yours to be the easiest to follow and most straightforward. These came out fantastic with the most gorgeous color! Now we can enjoy these at home when we have greek food! Thank you!
Alexandra
Melanie, I am so pleased that you made and enjoyed our Beetroot Pickled Turnips. They are so easy and I find there are many ways to enjoy them. 🙂
Heidi | The Frugal Girls
I had never thought to pickle turnips before. This is such a tasty fun homemade pickling idea. Yum! 😋
Alexandra
Thank you Heidi, I am so glad that you like the Pickled Turnip recipe. They are a great addition to an appetizer selection. 🙂
Jaimie
I have a secret: I have never eaten a turnip in my life! Now I think I have a reason too. Love this, and I love that beautiful colour from the beetroot. What a great way to use root vegies 🙂
Alexandra
Jaimie, I look forward to hearing how you enjoy your first taste of turnip. I hope that you like them. 🙂
Sarah
What a fun idea, I never would have thought of pickling turnips and that colour is amazing!
Alexandra
Hi Sarah, they are a great addition to a nibbles board; they add fabulous colour and flavour. I do hope that you try them. 🙂